
Operator's Manual


g006530
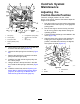
Figure111
1.Cuttingedge3.Wear/slotforming
2.Curvedarea4.Crack
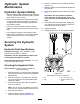
CheckingforBentBlades
1.Rotatethebladesuntiltheendsfaceforward
andbackward.
2.Measurefromalevelsurfacetothecutting
edge,positionA,oftheblades(Figure112).
g000975
Figure112
1.Measureherefromblade
tohardsurface
2.PositionA
3.Rotatetheoppositeendsofthebladesforward.
4.Measurefromalevelsurfacetothecuttingedge
ofthebladesatthesamepositionasinstep2
above.
Note:Thedifferencebetweenthedimensions
obtainedinsteps2and4mustnotexceed3
mm(1/8inch).
Note:Ifthisdimensionexceeds3mm(1/8
inch),thebladeisbentandmustbereplaced.
RemovingtheBlades
Side-DischargeMachines
Replacethebladesiftheyhitasolidobject,orifthe
bladeisoutofbalanceorbent.
1.Holdthebladeendusingaragorthicklypadded
glove.
2.Removethebladebolt,curvedwasher,and
bladefromthespindleshaft(Figure113).
g004536
Figure113
1.Sailareaoftheblade3.Curvedwasher
2.Blade4.Bladebolt
Rear-DischargeMachines
Important:Therightbladeonthismowerdeckis
counter-rotatingandusesaleft-threadedblade
bolt.
Replaceabladeifithitsanobject,ifthebladeisout
ofbalance,orifthebladeisbent.Toensureoptimum
performanceandcontinuedsafetyconformanceof
themachine,usegenuineTororeplacementblades.
Replacementbladesmadebyothermanufacturers
mayresultinnonconformancewithsafetystandards.
1.Holdthebladeendusingaragorthickly-padded
glove.
2.Removetheleftandcenterbladebolt,curved
washer,andbladefromthespindleshaft(Figure
114).
3.Removetherightbladebolt(leftthreadedbolt),
curvedwasher,andbladefromthespindleshaft
(Figure114).
Note:Notethetypeofbladeandwhereeach
bladeisinstalled.SeeFigure115forthecorrect
position.
70