
Operator's Manual


1.Holdthebladeendusingaragorthickly-paddedglove.
2.Removethebladebolt,curvedwasher,andbladefrom
thespindleshaft(Figure94).
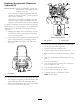
Figure94
1.Sailareaoftheblade3.Curvedwasher
2.Blade4.Bladebolt
SharpeningtheBlades
WARNING
Whensharpeningblade,piecesofbladecouldbe
thrownandcauseseriousinjury.
Wearpropereyeprotectionwhensharpeningblade.
1.Usealetosharpenthecuttingedgeatbothendsof
theblade(Figure95).
Note:Maintaintheoriginalangle.Thebladeretains
itsbalanceifthesameamountofmaterialisremoved
frombothcuttingedges.
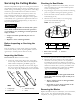
Figure95
1.Sharpenatoriginalangle
2.Checkthebalanceofthebladebyputtingitonablade
balancer(Figure96).Ifthebladestaysinahorizontal
position,thebladeisbalancedandcanbeused.Ifthe
bladeisnotbalanced,lesomemetalofftheendofthe
sailareaonly(
Figure97).
Note:Repeatthisprocedureuntilthebladeis
balanced.
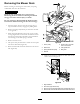
Figure96
1.Blade2.Balancer
InstallingtheBlades
1.Installthebladeontothespindleshaft(Figure97).
Important:Thecurvedpartoftheblademust
pointupwardtowardtheinsideofthemowerto
ensurepropercutting.
2.Installthespringdiskandbladebolt.Thespringdisk
conemustbeinstalledtowardthebolthead(Figure97).
Torquethebladeboltto115-150N-m(85-110ft-lb).
Figure97
1.SailAreaofBlade
4.BladeBolt
2.Blade
5.ConeTowardsBoltHead
3.SpringDisk
58