
Operator's Manual
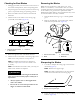


Figure100
1.Clutchpulley5.Squareholeintheidler
armfortheratchet
2.Mowerbelt
6.Idlergreasetting
3.Spring-loadedidlerpulley
7.Beltguide
4.Ratchet
7.Removeandretainthehardwareonbothsidesofthe
deck(Figure101).
Figure101
1.Rightstabilizer
2.Deckstrut(rightsideshown)
3.Removethereardeck-liftattachmentshoulderboltandnut.
4.Removethefrontdeck-liftattachmentshoulderboltandnut.
8.Raisethedeckstrutsandsecurethemintheup
position.
9.Slidethedeckouttotherightsideofthemachine.
ReplacingtheGrassDeector
WARNING
Anuncovereddischargeopeningcouldallowthe
lawnmowertothrowobjectsintheoperator'sor
bystander'sdirectionandresultinseriousinjury.
Also,contactwiththebladecouldoccur.
Donotoperatethelawnmowerunlessyouinstalla
coverplate,amulchplate,grassdeectororbagger.
1.Removethelocknut,thebolt,thespring,andthespacer
holdingthedeectortothepivotbrackets(Figure102).
2.Removethedamagedorworngrassdeector(Figure
102).
g015594
1
6 2
4
7
3
5
Figure102
1.Bolt
5.Springinstalled
2.Spacer6.GrassDeector
3.Locknut
7.J-hookendofspring
4.Spring
3.Placethespacerandthespringontograssdeector.
4.PlaceoneJ-endofthespringbehindthedeckedge.
Note:MakesureoneJ-endofthespringisinstalled
behindthedeckedgebeforeinstallingtheboltas
showninFigure102.
5.Installtheboltandthenut.
6.PlaceoneJhookendofthespringaroundthegrass
deector(Figure102).
Important:Thegrassdeectormustbeable
torotate.Liftthedeectoruptothefullopen
positionandensurethatitrotatesintothefull
downposition.
63