
Operator's Manual


WARNING
Thespringisundertensionwhen
installedandcancausepersonalinjury.
Becarefulwhenremovingthebelt.
11.Usingaspring-removaltool,(T oroPartNo.
92-5771),installtheidlerspringoverthedeck
postandplacingtensionontheidlerpulleyand
mowerbelt(Figure66).
12.Ensurethatthebeltisproperlyseatedinall
pulleys.
13.T oinstallthebeltcovers,insertthetabsonthe
eachcoverintothecorrespondingslotsonthe
deckbracket,ensuringthattheyseat.
14.Rotatethecovertothedeckandslidethe
notchesundertheloosenedboltsuntiltheyare
seated.
15.Tightentheboltstosecurethecovertothedeck.
RemovingtheMower
Parkthemachineonalevelsurfaceanddisengage
theblade-controlswitch.Movethemotion-control
leversoutwardtotheNEUTRAL-LOCKposition,engage
theparkingbrake,shutofftheengine,removethekey,
andwaitforallmovingpartstostopbeforeleavingthe
operatingposition.
Lowerthemowertothelowestheightofcut.Select
oneofthefollowingproceduresdependingonthe
mowerdecksizeinstalledtocompletetheremoval.
PreparingtoRemovetheMower
Deck
1.Lowerthemowertothe76mm(3inch)
height-of-cutposition.
2.Removethemowerbeltfromtheenginepulley;
refertoReplacingtheMowerBelt(page45).
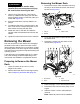
RemovingtheMowerDeck
1.Removethehairpincotterandwashersecuring
thelinkpintotheframeanddeck,andremove
thelinkbar(Figure67).
g028276
Figure67
1.Linkpin3.Hairpincotter
2.Washer
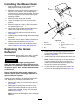
2.Liftupthemowerdecktorelievetensionfrom
themowerdeck.
3.Removethechainsfromthehooksonthe
deck-liftarms(Figure68).
g024313
Figure68
1.Deck-liftarm
3.Hook
2.Chain
4.Adjustmentbolt
4.Raisetheheightofcuttothetransportposition.
5.Removethebeltfromtheclutchpulleyonthe
engine.
6.Slidethemoweroutfromunderneaththe
machine.
Note:Retainallpartsforfutureinstallation.
46