
Operator's Manual


g024313
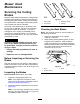
Figure64
1.Deck-liftarm
3.Hook
2.Chain
4.Adjustmentbolt
6.Ensurethatthereistensiononall4chains
(Figure64).
7.Tightenthe4adjustmentbolts(Figure64).
8.Ensurethattheblockstsnuglyunderthedeck
skirtandthatallboltsaretight.
9.Verifythatthedeckislevelbycheckingthe
side-to-sidelevelandfront-to-rearbladeslope;
repeatthedecklevelingprocedureifnecessary.
InspectingtheBelts
ServiceInterval:Every50hours
Checkthebeltsforsquealingwhenthebeltisrotating,
bladesslippingwhencuttinggrass,frayedbeltedges,
burnmarksandcracksaresignsofawornmower
belt.Replacethemowerbeltifanyoftheseconditions
areevident.
ReplacingtheMowerBelt
Squealingwhenthebeltisrotating,bladesslipping
whencuttinggrass,frayedbeltedges,burnmarks,
andcracksaresignsofawornmowerbelt.Replace
themowerbeltifanyoftheseconditionsareevident.
1.Disengagetheblade-controlswitch(PTO),move
themotion-controlleverstotheNEUTRAL-LOCK
position,andsettheparkingbrake.
2.Shutofftheengine,removethekey,andwait
forallmovingpartstostopbeforeleavingthe
operatingposition.
3.Lowerthemowertothe76mm(3inch)
height-of-cutposition.
4.Foreachofthebeltcovers,loosenthe2bolts,
butdonotremovethem.
5.Slidethecoveruntilitisclearoftheboltsandlift
itupandouttoremoveit.
6.Removetheoorpantoaccesstheidlerpulley.
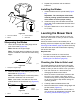
7.Usingaspringremovaltool,(T oroPartNo.
92-5771),removetheidlerspringfromthe
deckposttoremovetensionontheidlerpulley
(Figure65).
g020312
Figure65
1.Spring-removaltool(Toro
PartNo.92-5771)
4.Idlerarm
2.Idlerspring5.Mowerbelt
3.Deckpost
8.Lowerthemowertothelowestheightofcutand
placetheheight-of-cutpininthelockpositionfor
thelowestheight-of-cut.
9.Removethebeltfromthemower-deckpulleys
andremovetheexistingbelt.
10.Installthenewbeltaroundthemowerpulleys
andtheclutchpulleyundertheengine(Figure
65).
46