
Service Manual


CHASSIS
3-21
Toro TITAN 2014 Service Manual
3
Seat Support / Fender Support
Service
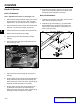
Seat Support Removal (MX Shown)
1. Raise seat and disconnect battery terminals
2. Remove RH and LH pods / fenders as shown in this
chapter.
3. Remove the (2) bolts that secure the hydro
expansion tank (A) to the seat support.
4. Remove the (1) fastener securing the fuel tank
retaining rod (B) to the seat support. Remove the
fuel tank retaining rod from unit.
5. If necessary, disconnect and properly secure the fuel
/ vent line(s) from the top of the fuel tank assembly.
Note: The fuel tank is labeled “FUEL” for the fuel
hose tting connection and “VENT” for the
fuel tank vent tting connection.
6. Note the location of and remove any cable ties /
loom clamps securing wiring and cables to the seat
support bar.
7. Remove the (2) bolts and nuts (C) that secure the
seat support to the frame brackets.
8. Remove the seat support bar from the frame
(Fig. 037).
Seat Support Installation (MX Shown)
1. Position the Seat Support assembly into the unit
frame.
2. Install the (2) bolts and nuts (C) that secure the
seat support to the frame brackets and torque to
specication – 17 ft-lbs. (23 Nm).
3. Install the fuel tank retaining rod (B) and torque
retaining bolt to specication – 8 ft-lbs. (11 Nm). Be
sure the front rod end is engaged into the control
box assembly (Fig. 038).
Fig. 038 PICT-2069
4. Install the (2) bolts that secure the hydro expansion
tank (A) to the seat support and torque to
specication – 5 ft-lbs. (7 Nm).
5. Properly route cables / wiring and reinstall cable ties
/ loom clams to secure them to the seat support.
6. If necessary, properly route and install the fuel / vent
line(s) to the fuel tank assembly.
7. Install RH and LH pod / fender as outlined in this
chapter.
8. Connect the battery cables and lower seat.
9. Verify proper function.
Fig. 037 PICT-3016
B
CC A A
B