
Operator's Manual


g023855
1
2
3
4
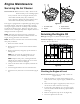
Figure29
1.Oildipstick3.Oillevel—Lowmark
2.Oillevel—Fullmark
4.Fillertube
6.Pullthedipstickout,andchecktheoillevel.(Figure
29).
Note:Theoillevelshouldbeupto,butnotover,the
FullorFmarkonthedipstick
7.Ifthelevelislow,addoilofthepropertype,uptothe
FullorFmarkonthedipstick.
Note:Alwayscheckthelevelwiththedipstickbefore
addingmoreoil.
Note:Topreventextensiveenginewearordamage,
alwaysmaintaintheproperoillevelinthecrankcase.
Neveroperatetheenginewiththeoillevelbelowthe
AddorLmarkorabovetheFullorFmarkonthe
dipstick.
8.Removedipstickandcheckoillevel.
Note:ThelevelshouldbebetweentheFullorFand
AddorLmarks.Iflow ,addoilofthepropertypeup
tothefullmark.
9.Installtheoil-llcap/dipstick.
ChangingtheEngineOilandthe
Engine-oilFilter
ServiceInterval:Every100hours—Changetheengineoil
andtheengine-oillter.
Fillwithoilasspeciedinthe“ViscosityGrades”table
(Figure28).
Changetheengineoilandtheengine-oillterwhilethe
engineisstillwarm.Theoilwillowmorefreelyandcarry
awaymoreimpurities.Makesurethattheengineislevelwhen
lling,checking,orchangingtheoil.
Changetheengineoilandtheengine-oillterasfollows:
1.Parkthemachine,sothatthedrainsideisslightlylower
thantheoppositeside,toensurethattheoildrains
completely.
2.Disengagetheblade-controlswitchandmovethe
motioncontrolsoutwardtotheparkposition.
3.Stoptheengine,removethekey,andwaitforallmoving
partstostopbeforeleavingtheoperatingposition.
4.Locatetheoil-drainhoseontheleftsideoftheengine.
(
Figure30).
Note:Thedrainplugisattachedtothedrainhose.
5.Cleantheareaaroundtheoil-drainplugandthe
oil-drainhose.
6.Placeadrainpanunderneaththemachine,directly
belowtheoil-drainhoseasshowninFigure30.
Figure30
1.Oil-drainplug3.Oil-drainhose
2.Pan
7.Using2wrenches(onetoholdtheoil-drainhoseand
onetoloosentheplug),removetheoil-drainplug
(Figure30).
8.Removetheoil-llcap/dipstick(Figure29).
9.Allowampletimeforcompletedrainage.
10.Locatetheoillterontherightsideoftheengine,and
removetheoldlterandwipeoffthelteradapter
withacleancloth(
Figure31).
25