
Service Manual


ELECTRICAL
7-7
Toro TimeCutter SS/MX/ZS Service Manual
7
Brake Actuator Module Replacement
Brake Actuator Module Removal
1. Tilt seat forward and disconnect battery.
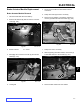
2. Remove the fastener (B) that secures the connector
cover (Fig. 158).
A. Starter solenoid B. Screw
C. Locking tab
Fig. 158 PICT-1017a
3. Disengage the connector cover tab (C) and remove
shield (Fig. 159).
Fig. 159 PICT-1018
B
A
C
4. Disconnect the Brake Actuator Module harness
connection.
5. Safely raise and support unit if necessary.
6. Remove the (2) hairpins, (2) washers, and discon-
nect the (2) brake rods from the module (Fig. 160).
Fig. 160 IMG-0968a
7. Safely lower unit if necessary.
8. While supporting the brake module, remove the (4)
screws that attach it to the chassis (Fig. 161).
Fig. 161 PICT-1019
9. Remove brake module from the chassis.