
Operator's Manual


21
7. Slowly pour approximately 80% of the specified
amount of oil, page 20, into the fill hole (Fig. 15).
Check the oil level; refer to Checking the Oil Level,
page 20. Slowly add additional oil to bring the level to
the Full mark on the dipstick.
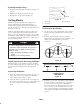
Changing the Oil Filter
Replace the oil filter every 100 hours or every other oil
change.
Note: Change the oil filter more frequently when operating
conditions are extremely dusty or sandy.
1. Drain the oil from the engine; refer to Changing and
Draining the Oil, page 20.
2. Remove the old filter and wipe the filter adapter
(Fig. 18) gasket surface.
3. Apply a thin coat of clean oil to the rubber gasket on the
replacement filter (Fig. 18).
1
2
3
1256
Figure 18
1. Oil filter
2. Gasket
3. Adapter
4. Install the replacement oil filter to the filter adapter.
Turn the oil filter clockwise until the rubber gasket
contacts the filter adapter; then tighten the filter an
additional 1/2 to 3/4 turn (Fig. 18).
5. Fill the crankcase with the proper type of new oil; refer
to Changing and Draining the Oil, page 20.
Servicing the Air Cleaner
Foam Element: Clean after every 25 operating hours, or
yearly, whichever occurs first.
Paper Element: Replace after every 100 operating hours or
yearly, whichever occurs first.
Note: Service the air cleaner more frequently (every few
hours) if operating conditions are extremely dusty or sandy.
Removing the Foam and Paper Elements
1. Disengage the PTO, set the parking brake, stop the
engine, and remove the ignition key.
2. Clean around the air cleaner to prevent dirt from getting
into the engine and causing damage. Pull up on the air
cleaner cover handle and rotate it toward the engine
(Fig. 19). Remove the air cleaner cover.
1
2
Figure 19
1. Air cleaner cover 2. Air cleaner cover handle
3. Carefully slide the paper element and foam element
from the blower housing (Fig. 20).
2
1
3
5
4
Figure 20
1. Paper element
2. Foam element
3. Air cleaner cover
4. Tab
5. Slot