
Operator's Manual


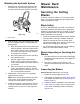


3.Removetherightbladebolt(left-handthreaded
bolt),curvedwasher,andbladefromthespindle
shaft(Figure116).
Note:Notethebladetypeandwhereeach
bladeisinstalled.SeeFigure116forthecorrect
position.
g017443
Figure115
LeftandCenterSpindleShown
1.Sailareaoftheblade
4.Bladebolt
2.Blade
5.Spindleshaft
3.Curvedwasher
InstallingtheBladesforRearDischarge
MowerDecks
Important:Therightbladeonthismower
deckiscounter-rotatingandusesaleft-hand
threadedbladebolt.UseFigure116forthecorrect
placementofthemowerblades.
1.Installtheleftandcenterblades,curved
washers,andbladeboltstothespindleshafts
(Figure115andFigure116).
Note:Ensurethecurvedpartofthebladeis
pointingupwardtowardtheinsideofthemower
decktoensurepropercutting.
Note:Ensurethecurved-washerconeis
installedtowardthebolthead(Figure115).
2.Installtherightblade,curvedwasher,andblade
bolt(left-handthreadedbolt)tothespindleshaft
(Figure115andFigure116).
3.Torquethebladeboltsto115to150N∙m(85to
110ft-lb);refertoFigure116.
g024248
Figure116
1.Frontofmowerdeck4.Counter-rotatingblade
2.Right-handthreadedblade
bolts
5.Left-handthreadedblade
bolt
3.Regularblades
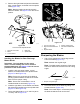
SharpeningtheBlades
1.Usealetosharpenthecuttingedgeatboth
endsoftheblade(Figure117).
Note:Maintaintheoriginalangle.
Note:Thebladeretainsitsbalanceifthesame
amountofmaterialisremovedfrombothcutting
edges.
g000552
Figure117
1.Sharpenatoriginalangle.
2.Checkthebalanceofthebladebyputtingiton
abladebalancer(Figure118).
Note:Ifthebladestaysinahorizontalposition,
thebladeisbalancedandcanbeused.
76