
Operator's Manual
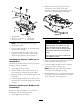


Figure 18
1. Right side bafe 4. Knob
2. Bolt (5/16 x 1-1/4 inches)
5. Curved washer
3. Locknut (5/16 inch)
6. Left side bafe
Note: Sa v e the hardw are for use when
installing the baffle .
3. Lift the baffle and slide it out of the interloc k
with the left side baffle .
4. F or safety , install the knobs , w ashers and
loc kn uts into the open holes of the mo w er ,
wherev er the hardw are w as remo v ed in 2 .
Installing the Recycler® Bafe on 44
Inch Mowers
Install the right baffle when con v er ting from side
disc harg e mode to m ulc hing .
1. T horoughly clean the mo w er .
2. R emo v e knobs , w ashers and loc kn uts in the
holes needed to install the right side baffle .
3. Install the baffle into the interloc k with the left
side baffle .
4. Install the right side baffle to the mo w er with
knobs and cur v ed w ashers ( Figure 18 ) remo v ed
in Ste p 2 .
Removing the Recycler® Bafe On 52
inch Mowers
R emo v e the right side baffle to con v er t from
m ulc hing to the side disc harg e mode .
1. T horoughly clean the mo w er .
2. R emo v e the car riag e bolts and loc kn uts
securing the front baffle to the dec k
( Figure 19 ). R emo v e the front baffle to g ain
access to the right side R ecycler® baffle .
Figure 19
Operating the mo w er without the fr ont
baf fle in place, can expose y ou and
other s to blade contact and thr o wn
de bris. Contact with r otating blade(s)
and thr o wn de bris will cause serious
injur y .
Nev er operate the mo w er without the
fr ont baf fle installed.
3. R emo v e the loc k n uts from the top and center
of the right side baffle ( Figure 20 ).
4. Lo w er the baffle and slide it out of disc harg e
opening to remo v e it ( Figure 20 ).
Note: Only the right side baffle needs be
remo v ed for side disc harg e mo wing .
5. Install the bolts (5/16 x 5/8 inc h) and loc kn uts
(5/16 inc h) remo v ed in Ste p 3 in the open holes
of the mo w er for safety ( Figure 20 ).
21