
Service Manual


MOWER DECK
6-17TimeCutter® Z/Precision® Z Service Manual
6
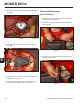
4. Carefully rotate the blades so they are facing front to
rear (Fig. 419 and Fig. 420).
A. Adjusting rod C. Lock nut
B. Adjusting block
Fig. 419 ¿J*
7. To raise the front of the mower, tighten the adjust-
ment nut. To lower the front of the mower, loosen the
adjustment nut.
8. After adjustment, check the front-to-rear slope again.
Continue adjusting the nut until the front blade tip is
1/16 - 5/16” (1.6 - 7.9mm) lower than the rear blade
tip (Fig. 419 and Fig. 420).
9. When the front-to-rear blade slope is correct check
the side-to-side level of the mower again; see “Side-
to-Side Leveling” on page 6-15.
0HDVXUHIURPWKHWLSRIWKHIURQWEODGHWRWKHÀDWVXU
IDFHDQGWKHWLSRIWKHUHDUEODGHWRWKHÀDWVXUIDFH
(Fig. 419 and Fig. 420). If the front blade tip is not
1/16 - 5/16” (1.6 - 7.9mm) lower than the rear blade
tip, adjust the front locknut.
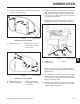
6. To adjust the front-to-rear blade slope, rotate the
adjustment nut in the front of the mower (Fig. 421).
Fig. 421 ¿J*
Mower Decks with 2 Blades
A. Blades front to rear B. Measure from the tip
RIWKHEODGHWRWKHÀDW
surface here
Fig. 420 ¿J*
Mower Decks with 3 Blades
A. Blades front to rear C. Measure from the tip
% 2XWVLGHFXWWLQJHGJHV RIWKHEODGHWRWKHÀDW
surface here
B
A
C
B
B
A
C
C
B
A
B