
Service Manual


Toro®- Z Master® 8000 Series Service Manual8-8
8
September 2016
Table of Contents
HOPPER AND BLOWER FAN
Hopper Full Switch Service
NOTE: Hopper full switch and motor testing is
detailed in the Electrical Chapter.
Removal
1. Disconnect the battery terminals.
2. Open the hopper door.
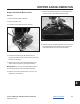
3. Cut and remove cable tie (A).
4. Pull the switch harnesses from the mounting
bracket. Disconnect the switch harness connection.
5. Remove the bolt (B) that secures the switch wiring
clamp to the motor bracket.
6. Remove the nut and bolt (C) that secures the switch
wiring clamp to the chute.
IMPORTANT: Do not drop mounting hardware down
the discharge tube and into the blower assembly.
7. Remove the two nuts and bolts (D). The switch can
now be removed from the switch bracket (Figure
149).
Installation
1. Position the switch back onto the mounting bracket.
2. Tighten the two mounting fasteners (D). Install the
nut and bolt (C) that secures the switch wiring
clamp to the chute and torque to 10 ft-lbs. (14 Nm).
IMPORTANT: Do not drop mounting hardware down
the discharge tube and into the blower.
3. Install the bolt (B) that secures the switch wiring
clamp to the motor bracket and torque to10 ft-lbs.
(14 Nm).
NOTE: Make sure the harness is routed so switch
asm. has room to rotate without pinching
or pulling the harness.
4. Connect the switch harness connection. Route and
tuck the wiring under the mounting bracket, and use
a new cable tie (A) to secure it.
5. Connect the battery and verify proper switch and
buzzer function.
C
B
D
A
Figure 89