
Service Manual


23PC Series
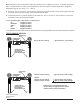
Refer to Figure 1.
Prior to disassembly, note the position of the scissor
arm brackets and the tab on the outer control arm
bracket.
Disassembly
CAUTION: The spring used on the return to neutral
linkage is under tension. To avoid possible injury,
use care and proper protection during disassembly
and assembly of the return to neutral linkage.
1. Loosen (but do not remove) the nut (106).
2. To relieve spring tension, carefully pry up on the
outer scissor control arm until it releases from
the tab on the outer control arm bracket.
3. Remove the spring (102), nut (106) washer (104)
and outer scissor control arm bracket.
4. Remove bushing (101), washer (105), and the
inner scissor control arm bracket.
5. Remove the outer control arm bracket, bolt
(103), washer (104) and the inner return arm
bracket.
PC SERIES PUMP REPAIR
REMOVAL, INSPECTION AND/OR
REPLACEMENT OF RETURN TO
NEUTRAL ASSEMBLY
Inspection
1. With the arm control linkage removed, inspect
the trunnion arm (37) and trunnion arm seal (49).
2. Inspect bushing (101) and all other linkage parts
for damage, corrosion or wear.
Assembly
1. Install the inner return arm bracket, washer (104)
and bolt (103).
NOTE: Do not over tighten the bolt (103). The
bracket must move freely.
2. Install the outer control arm bracket, washer
(105) and bushing (101).
3. Install the inner scissor control arm bracket,
washer (105), and outer scissor control arm
bracket.
4. Install washer (104), and nut (106). Tighten to
the correct torque value. See page 22.
5. Install the spring (102).
Figure 1. Return to Neutral Assembly
49
37
104
105
103
105
110
101
102
104
106