
Operator's Manual
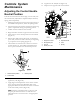


2.Removethebladebolt,curvedwasher,andbladefrom
thespindleshaft(Figure88).
SharpeningtheBlades
WARNING
Whensharpeningblades,piecesofthebladecould
bethrownandcauseseriousinjury.
Wearpropereyeprotectionwhensharpening
blades.
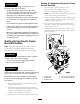
1.Usealetosharpenthecuttingedgeatbothendsof
theblade(Figure86).Maintaintheoriginalangle.The
bladeretainsitsbalanceifthesameamountofmaterial
isremovedfrombothcuttingedges.
Figure86
1.Sharpenatoriginalangle
2.Checkthebalanceofthebladebyputtingitonablade
balancer(Figure87).Ifthebladestaysinahorizontal
position,thebladeisbalancedandcanbeused.Ifthe
bladeisnotbalanced,lesomemetalofftheendof
thesailareaonly(Figure88).Repeatthisprocedure
untilthebladeisbalanced.
Figure87
1.Blade2.Balancer
InstallingtheBlades
1.Installthebladeontothespindleshaft(Figure88).
Important:Thecurvedpartoftheblademustbe
pointingupwardtowardtheinsideofthemowerto
ensurepropercutting.
2.Installthecurvedwasherandbladebolt.Thecurved
washerconemustbeinstalledtowardthebolthead
(
Figure88).Torquethebladeboltto85-110ft-lb
(115-150N-m).
Figure88
1.Sailareaoftheblade3.Curvedwasher
2.Blade4.Bladebolt
ReplacingtheGrassDeector
WARNING
Anuncovereddischargeopeningcouldallowthe
lawnmowertothrowobjectsintheoperator'sor
bystander'sdirectionandresultinseriousinjury.
Also,contactwiththebladecouldoccur.
•Neveroperatethemachineunlessyouinstalla
coverplate,amulchplate,oragrasschuteand
catcher.
•Makesurethatthegrassdeectorisinthedown
position.
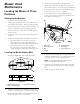
1.Removethelocknut,bolt,spring,andspacerholding
thedeectortothepivotbrackets(Figure89).Remove
thedamagedorworngrassdeector.
2.Placethespacerandspringontograssdeector.Place
theLendofspringbehinddeckedge.
Note:MakesuretheLendofthespringisinstalled
behindthedeckedgebeforeinstallingtheboltas
showninFigure89.
3.Installtheboltandnut.PlacetheJhookendofthe
springaroundthegrassdeector(Figure89).
Important:Thegrassdeectormustbeableto
lowerdownintoposition.Liftthedeectorupto
testthatitlowersintothefulldownposition.
59