
Operator's Manual


Contact with a shar p blade can cause serious
injur y .
W ear g lo v es or wrap shar p edges of the
blade with a ra g .
1. Hold the blade end using a rag or
thic kly-padded glo v e .
2. R emo v e the blade bolt, spring disk and blade
from the spindle shaft ( Figure 79 ).
Sharpening the Blades
W hen shar pening blade, pieces of blade
could be thr o wn and cause serious injur y .
W ear pr oper ey e pr otection when shar pening
blade.
1. Use a file to shar pen the cutting edg e at both
ends of the blade ( Figure 77 ). Maintain the
original angle . T he blade retains its balance if
the same amount of material is remo v ed from
both cutting edg es .
Figure 77
1. Sharpen at original angle
2. Chec k the balance of the blade b y putting it on
a blade balancer ( Figure 78 ). If the blade sta ys
in a horizontal position, the blade is balanced
and can be used. If the blade is not balanced,
file some metal off the end of the sail area only
( Figure 79 ). R e peat this procedure until the
blade is balanced.
Figure 78
1. Blade 2. Balancer
Installing the Blades
1. Install the blade onto the spindle shaft
( Figure 79 ).
Important: T he cur v ed par t of the blade
must be pointing up w ard to w ard the inside
of the mo w er to ensur e pr oper cutting .
2. Install the spring disk and blade bolt. T he
spring disk cone m ust be installed to w ard the
bolt head ( Figure 79 ). T or que the blade bolt to
85-110 ft-lb (115-150 N•m).
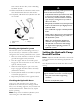
Figure 79
1. Sail Area of Blade 4. Blade Bolt
2. Blade 5. Cone Towards Bolt Head
3. Spring Disk
57