
Operator's Manual


( Figure 75 ). R e peat this procedure until the
blade is balanced.
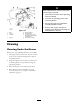
Figure 74
1. Blade 2. Balancer
Installing the Blades
1. Install the blade onto the spindle shaft
( Figure 75 ).
Important: T he cur v ed par t of the blade
must be pointing up w ard to w ard the inside
of the mo w er to ensur e pr oper cutting .
2. Install the spring disk and blade bolt. T he
spring disk cone m ust be installed to w ard the
bolt head ( Figure 75 ). T orque the blade bolt
to 85-110 ft-lb (115-150 N ⋅ m).
Figure 75
1. Sail Area of Blade 4. Blade Bolt
2. Blade 5. Cone Towards Bolt Head
3. Spring Disk
Replacing the Grass
Deector
An unco v er ed discharge opening could
allo w the la wn mo w er to thr o w objects in
the operator’ s or bystander’ s dir ection and
r esult in serious injur y . Also, contact with
the blade could occur .
• Nev er operate the la wn mo w er unless
y ou install a co v er plate, a mulch plate, or
a g rass chute and catcher .
• Mak e sur e the g rass deflector is in the
do wn position.
1. R emo v e the loc kn ut, bolt, spring and spacer
holding the deflector to the pi v ot brac k ets
( Figure 76 ). R emo v e the damag ed or w or n
g rass deflector .
2. Place the spacer and spring onto g rass
deflector . Place the L end of spring behind
dec k edg e .
Note: Mak e sure the L end of the spring is
installed behind the dec k edg e before installing
the bolt as sho wn in Figure 76 .
3. Install the bolt and n ut. Place the J hook
end of the spring around the g rass deflector
( Figure 76 ).
Important: T he g rass deflector must be
a ble to lo w er do wn into position. Lift the
deflector up to test that it lo w er s into the
full do wn position.
55