
Operator's Manual


38
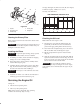
6. Recheck the fluid level while the fluid is warm. If
required, add fluid to the reservoir until it reaches the
hot level of the baffle.
Note: The fluid level should be to the top of the hot level
of the baffle, when the fluid is warm (Fig. 40).
7. Install cap on filler neck.
3
1
2
m–5615
4
Figure 40
1. Cap
2. Baffle
3. Cold fluid level—full
4. Hot fluid level—full
Hydraulic fluid escaping under pressure can
penetrate skin and cause injury.
• If hydraulic fluid is injected into the skin it
must be surgically removed within a few hours
by a doctor familiar with this type of injury.
Gangrene may result if this is not done.
• Keep body and hands away from pin hole leaks
or nozzles that eject high pressure hydraulic
fluid.
• Use cardboard or paper to find hydraulic leaks.
• Safely relieve all pressure in the hydraulic
system before performing any work on the
hydraulic system.
• Make sure all hydraulic fluid hoses and lines
are in good condition and all hydraulic
connections and fittings are tight before
applying pressure to hydraulic system.
Warning
Replacing the Hydraulic Filter
Change the hydraulic filter:
After the first 8 operating hours.
After every 200 operating hours.
1. Disengage the power take off (PTO) and turn the
ignition key to off. Move levers to neutral locked
position and apply parking brake. Remove the key.
Important Do not substitute automotive oil filter or
severe hydraulic system damage may result.
2. Remove hydro cap and temporarily cover opening
with a plastic bag and rubber band to prevent all hydro
fluid from draining out.
3. Place a drain pan under filter, remove the old filter and
wipe the filter adapter gasket surface clean (Fig. 41).
1
M–4763
Figure 41
1. Hydraulic filter
4. Apply a thin coat hydro fluid to the rubber gasket on
the replacement filter (Fig. 42).
5. Install replacement hydraulic filter onto the filter
adapter. Do not tighten.
6. Remove plastic bag from tank opening and allow filter
to fill with hydro fluid.
7. When fluid overflows filter turn the oil filter clockwise
until the rubber gasket contacts the filter adapter, then
tighten the filter an additional 1/2 turn (Fig. 42).
8. Clean up any spilled fluid.
9. If there is no fluid or it is low, add fluid to reservoir
approximately a 1/4 in. (6mm) below the top of baffle.
10. Start engine and let run for about two minutes at low
idle. This will purge air from the system. Stop the
engine and check for leaks. If one or both wheels will
not drive, refer Bleeding Hydraulic System, page 39.