
Operator's Manual


46
2
1
3
4
M–4312
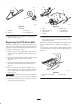
Figure 64
Top View
1. Deck Belt
2. Idler Arm
3. Idler nuts
4. Idler adjusting nut
6. Reinstall the PTO drive belt. Refer to Replacing the
PTO Drive Belt, page 46.
Replacing the PTO Drive Belt
Squealing when the belt is rotating, blades slipping when
cutting grass, frayed belt edges, burn marks and cracks are
signs of a worn drive belt. Replace the PTO drive belt if
any of these conditions are evident.
1. Stop the engine, set the parking brake, remove the key
and disconnect the spark plug wire(s) from the spark
plug(s).
2. Remove the clutch retaining strap from machine frame
and unplug clutch terminal from wire harness
(Fig. 65).
3. Remove PTO drive belt from rear idler arm and front
idler pulley assembly. Remove the PTO drive belt
(Fig. 65).
4. Place new drive belt over clutch, around rear idler
pulley, installed into rear idler arm assembly, installed
into front idler pulley assembly and onto top center
pulley (Fig. 65).
Important Check the amount of twist in belt between
pulleys. Make sure it is only what is specified in figure 65.
5. Install clutch retaining strap and plug clutch terminal
into main wire harness (Fig. 65).
1
4
m–4451
M–4373
3
2
5
7
6
6
Figure 65
1. Clutch
2. Clutch retaining strap
3. clutch Terminal
4. PTO belt
5. Machine Frame
6. 1/4 inch Belt Twist
7. 1/8 inch Belt Twist
6. Check belt tension. The center bolt of spring loaded
idler must be between the two alignment holes in left
support plate (Fig 66).
Note: Check position of center bolt in Low Height of Cut.
The center bolt must be at or below the top alignment
hole.
Check position of center bolt in a High Height of Cut. The
center bolt must be at or above the lower adjustment hole
(Fig 66).
1
2
M–4417
Figure 66
1. Center bolt, spring loaded
idler
2. Alignment hole