
Operator's Manual


28
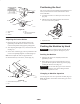
Installing the Blades
1. Install the blade onto the spindle shaft (Fig. 27).
Important The curved part of the blade must be
pointing upward toward the inside of the mower to ensure
proper cutting.
2. Install the flat washer, lock washer, and blade bolt
(Fig. 27). Torque the blade bolt to 85–110 ft.-lb.
(115–150 N⋅m).
Servicing the Air Cleaner
Primary Filter: Clean or replace every 200 operating hours.
Safety Filter: Replace after every 600 operating hours.
Note: Service the air cleaner more frequently if operating
conditions are extremely dusty or sandy.
Removing the Air Cleaner
1. Disengage the power take off (PTO), set the parking
brake, stop the engine, and remove the key. Remove the
spark plug wire(s).
2. Release the latches on the air cleaner and pull the air
cleaner cover off of the air cleaner body (Fig. 30).
3. Clean the inside of the air cleaner cover with
compressed air.
4. Gently slide the primary filter out of the air cleaner
body (Fig. 30). Avoid knocking the filter into the side of
the body. Do not remove the safety filter, unless you
intend to replace it as well.
5. Inspect the primary filter for damage by looking into
the filter while shining a bright light on the outside of
the filter. Holes in the filter will appear as bright spots.
If the filter is damaged discard it.
Important Never attempt to clean the safety filter. If
the safety filter is dirty, then the primary filter is damaged
and you should replace both filters.
4
3
5
1
2
1
m–4815
Figure 30
1. Latches
2. Air cleaner cover
3. Air filter body
4. Primary filter
5. Safety filter
Cleaning the Primary Filter
Blow compressed air from the inside to the outside of the
primary filter.
Important Do not exceed 100 psi (689 kPa) and keep
the hose at least 2 in. (51 mm) from the filter. Replace the
air filters if they are damaged or cannot be cleaned.
Installing the Filters
Important To prevent engine damage, always operate
the engine with both air filters and the cover installed.
1. If installing new filters, check each filter for shipping
damage. Do not use a damaged filter.
2. If the safety filter is being replaced, carefully slide it
into the filter body (Fig. 30).
3. Carefully slide the primary filter over the safety filter
(Fig. 30). Ensure that it is fully seated by pushing on the
outer rim of the filter while installing it.
Important Do not press on the soft inside area of the
filter.
4. Install the air cleaner cover with the side indicated as
UP facing up and secure the latches (Fig. 30).