
Operator's Manual


16
Activating the Battery
Bulk electrolyte with 1.265 specific gravity must be
purchased from a local battery supply outlet.
Danger
Battery electrolyte contains sulfuric acid which is a
deadly poison and causes severe burns.
• Do not drink electrolyte and avoid contact with
skin, eyes or clothing. Wear safety glasses to
shield your eyes and robber gloves to protect
your hands.
• Fill the battery where clean water is always
available for flushing the skin.
• Follow all instructions and comply with all
safety messages on the electrolyte container.
1. Remove the battery from the machine; refer to
Removing the Battery, page 45.
2. Clean the top of the battery with a paper towel.
Note: Never fill the battery with electrolyte while the
battery is installed in the machine. Electrolyte could be
spilled on other parts and cause corrosion.
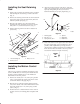
3. Remove the vent caps from the battery (Fig. 6).
4. Slowly pour electrolyte into each battery cell until the
level is up to the upper line (Fig. 6) on the battery case.
Important Do not overfill the battery because
electrolyte (sulfuric acid) can cause severe corrosion and
damage to the chassis.
5. Wait five to ten minutes after filling the battery cells.
Add electrolyte, if necessary, until the electrolyte level
is up to the upper line (Fig. 6) on the battery case.
6. Reinstall battery filler caps.
1
2
3
m–5004
Figure 6
1. Filler caps
2. Upper line
3. Lower line
Charging battery produces gasses that can explode
and cause serious injury.
• Keep cigarettes, sparks and flames away from
battery.
• Make sure the ignition switch is off.
• Ventilate when charging or using battery in an
enclosed space.
Warning
7. Charge the battery; refer to Charging the Battery,
page 46.
8. Install the battery into the machine; refer to Installing
the Battery, page 44.
Note: Do not run the machine with the battery
disconnected, electrical damage may occur.
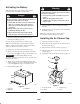
Installing the Air Cleaner Cap
1. Locate the air cleaner cap (Fig. 7).
2. Remove the plastic plug from the air intake in the air
cleaner canister (Fig. 7).
3. Place the clamp onto the air cleaner cap (Fig. 7).
4. Slide the clamp and air cleaner cap onto air cleaner
canister (Fig. 7).
5. Tighten the clamp to hold the air cleaner cap (Fig. 7).
m–6277
4
3
2
1
Figure 7
1. Air cleaner canister
2. Air intake
3. Air cleaner cap
4. Clamp