
Operator's Manual


30
1
2
m–1855
Figure 31
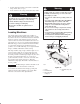
1. Blade 2. Balancer
Installing the Blades
1. Install the blade onto the spindle shaft (Fig. 29).
Important The curved part of the blade must be
pointing upward toward the inside of the mower to ensure
proper cutting.
2. Install the flat washer, lock washer, and blade bolt
(Fig. 29). Torque the blade bolt to 85–110 ft-lb
(115–150 N⋅m).
Cleaning the Cooling System
Clean the air intake screen from grass and debris before
each use.
Clean the cooling fins and engine shrouds every 300 hours
or yearly, which ever comes first.
1. Disengage the PTO, move the motion control levers to
the neutral locked position and set the parking brake.
2. Stop the engine, remove the key, and wait for all
moving parts to stop before leaving the operating
position.
3. Remove the air intake screen, air cleaner cover, fan
housing, and bolts (Fig. 32).
4. Clean debris and grass from the engine shrouds and
cooling fins.
5. Reinstall the air intake screen, air cleaner cover, fan
housing, and bolts (Fig. 32). Torque the bolts to 4.3 ft-lb
(5.8 N⋅m).
1
2
3
4
5
6
5
5
m–4369
Figure 32
1. Air intake screen
2. Fan housing
3. Air cleaner cover
4. M6 x 10mm bolt
5. M6 x 12mm bolt
6. M6 x 20mm bolt
Servicing the Air Cleaner
Primary Filter: Check and/or replace after every
200 operating hours or more often in dusty conditions.
Safety Filter: Replace after every 600 operating hours.
Note: Check the filters more frequently if operating
conditions are extremely dusty or sandy.
Removing the Filters
1. Disengage the PTO, move the motion control levers to
the neutral locked position and set the parking brake.
2. Stop the engine, remove the key, and wait for all
moving parts to stop before leaving the operating
position.
3. Release the latches on the air cleaner and pull the air
cleaner cover off of the air cleaner body (Fig. 33).
4. Clean the inside of the air cleaner cover with
compressed air.
5. Gently slide the primary filter out of the air cleaner
body (Fig. 33). Avoid knocking the filter into the side of
the body.