
Service Manual
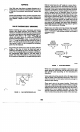


FIGURE
21.
BEARINGS
FOR
REAR
BEARING PLATE
Engines shipped
from
the
factory
have separate thrust
washers and main bearings
for
both front and
rear
of
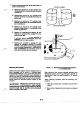
engine. Front bearing replacement part is a one piece
bearing (with attached thrust washer) as shown in
Figure
22.
Do
not add an additional thrust washer to this
front
bearing.
FROM
MAIN
In the rear bearing plate, install the bearing flush to
1
/64
inch
(0.40
mm) below the end of the bore.
Be
sure
to align the oil holes in the bearing with the oil holes in
the bearing bore (Figure
21).
The
oil
passage must be at
least half
open.
Lubricate bearing after installation.
If
head of lock pin is damaged, use side cutters
or
Easy
Out tool to remove and install new pin. Oil grooves in
thrust washers must face the crankshaft, and washers
must be flat (not bent). The two notches
on
each washer
must
fit
over the
two
lock pins to prevent riding on the
crankshaft (Figure
21).
Lubricate the front main bearing lightly with oil and
insert the crankshaft. With the rear bearing plate gasket
in place and the rear plate bearing lubricated, slide the
thrust washer (grooves toward crankshaft) and plate
over the end of the crankshaft.
A
light film of oil on the
thrust washer may hold
it
in place while installing
bearing plate over crankshaft. Line up notches of thrust
washer with lock pins before tightening end plate
or
lock pins will be damaged.
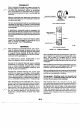
CRANKSHAFT ENDPLAY
After
the
rear
bearing end' plate has been tightened,
using the torque recommended in
ASSEMBLY TORQUES
AND SPECIAL TOOLS,
check the crankshaft endplay
(Figure
23).
If
there is too much endplay
(see
DI-
MENSIONS AND CLEARANCES
for
minimum and
maximum endplay), remove the rear bearing end plate
and add a Shim (Figure
21)
between the thrust washer
and plate. Reinstall the end plate, making sure the thrust
washer and shim- notches line up with the lock pins.
Torque and recheck endplay of the crankshaft.
FIGURE
23.
CRANKSHAFT
ENDPLAY
I