
Service Manual


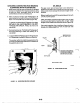


BEARING
BORE
TOP
MAIN
ALIGN
BEARING
NOTCHES
WITH
REPLACEMENT
TOP
MAIN
BEARING
FIGURE
20.
TOP MAIN BEARING INSTALLATION
Replacement top main bearing has the thrust washer
attached to the bearing.
Do
not add an additional thrust
washer to this.
Breathing vapor from towelette and
prolonged contact with skin can be
harmful. Use
only
in
we//
ventilated area and avoid
prolonged contact with skin.
Before installing the top main bearing use the towelette
included with the bearing kit to clean the outside
of
the
bearing and bearing bore in the block. Allow three
to
four minutes to dry. Apply Locktite from the small tube to
the mating surfaces of the bearing and the bearing bore.
Align the lock pin and oil holes in the bearing with the
lock pins and oil holes in the bearing bore (Figure
20).
Use a combination driver and install the bearing flush
with the block. The oil holes must be at least half open
after installation. Wipe
off
excess Locktite around the
bearing. Allow at least one hour at room temperature for
hardening.
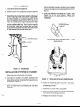
OIL
BASE/BEARlNG
,005''
(0.127mm)
LS-1183
The bottom main bearing consists of two bearings. Use
a combination driver and lubricate the outside
of
the
bearings with
SAE
30
oil before installing them to the
dimension shown (Figure
21).
Oil holes in the bearings
must line up
with
those drilled in the engine block
so
a
1
/8"
diameter pin can be inserted into hole. Lubricate
main bearings lightly with oil after installation.
Place the thrust washer on the oil base
so
the notches fit
over the lock pins and the grooves are facing away from
the oil base (Figure
22).
Place a new oil base gasket on
oil base. insert crankshaft into
top
main bearing. Install
oil
base on engine block.
Be
sure thrust washer has not
moved
off
lock pins before tightening oil base or
lock
pins will be damaged.
OIL
BASE
A
THRUST
WASHER
GROOVES
LS-1186
FIGURE
22.
OIL
BASE THRUST WASHER AND
SHIM
CRANKSHAFT
ENDPLAY
Tighten
the
oil base
to
the torque recommended in
ASSEMBLY
TORQUES
AND SPECIAL TOOLS.
Check
the crankshaft endplay (Figure
23)
and compare
it
with
that specified
in
DIMENSIONS AND CLEARANCES.
If
endplay exceeds limits remove
oil
base and add shim(s)
between the. thrust washer and
oil
base. Install oil base,
making sure; the thrust washer and shim(s) notches line
up with the lock pins. Torque oil base and check
endplay.
!-
BLOCK
FIGURE
21.
BOTTOM MAIN BEARING INSTALLATION
10-14
MEASURE
EN
HERE
CT-1095
FIGURE
23.
CRANKSHAFT ENDPLAY