
Setup Instructions


Set-Up Instructions
4
1
2
3
1262
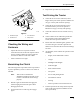
Figure 4
1. Filler
caps
2. Electrolyte
3.
Lower part of tube
POTENTIAL
HAZARD
• Charging battery pr
oduces gasses.
WHAT CAN HAPPEN
• Battery gasses can explode.
HOW TO AV
OID THE HAZARD
• Keep cigarettes, sparks and flames away
from battery.
3. Leave the filler caps off and connect a 3–4 amp
battery charger to the battery posts (Fig. 5).
Charge the battery at a rate of 4 amperes or less
for 4 hours (12 volts).
4. When the battery is fully charged, unplug the
charger from electrical outlet, then disconnect
the charger leads from the battery posts (Fig. 5).
4
1
2
3
1254
Figure 5
1. Positive
battery post
2.
Negative battery post
3.
Red (+) charger lead
4.
Black (–) charger lead
5. Slowly pour electrolyte into each cell until the
level is once again up to “UPPER” line on the
battery case (Fig. 4), then install the filler caps.
6. Install the battery in the tractor and connect the
battery cables (refer to Installing the Battery in
your tractor Operator’s Manual).
Note: Do not run the tractor with the battery
disconnected.
Installing
the Drawbar Hitch
Pin
Insert the drawbar hitch pin into the drawbar hitch
and secure it with a .50” I.D. flat washer and hairpin
cotter (Fig. 6).