
Operator's Manual

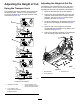


g024243
Figure36
1.Bolt3.Anti-scalproller
2.Bushing4.Flangenut
AdjustingtheSkid(s)
ForMachineswithRearDischarge
Mounttheskidsinthelowerpositionwhenoperating
inheightofcutshigherthan64mm(2-1/2inches)and
inthehigherpositionwhenoperatinginheightofcuts
lowerthan64mm(2-1/2inches).
Note:Whentheskidsbecomeworn,switchtheskid
totheoppositesidesofthemower,ippingthem
over.Thisallowsyoutousetheskidslongerbefore
replacingthem.
1.Parkthemachineonalevelsurface,disengage
theblade-controlswitch,andengagetheparking
brake.
2.Shutofftheengine,removethekey,andwait
forallmovingpartstostopbeforeleavingthe
operatingposition.
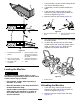
3.Removethecarriageboltsandnutsfromeach
skid(Figure37).
g024244
Figure37
1.Carriagebolt
3.Nut
2.Skid
4.Moveeachskidtothedesiredpositionand
securethemwiththecarriageboltsandnuts.
Note:Onlyusethetoporcentersetsofholes
toadjusttheskids.Thebottomholesareused
whenswitchingsidesonthemowerdeck,at
whichtimetheybecomethetopholesonthe
othersideofthemower.
5.Topreventdamagingtheskid,torquethe
carriageboltsandnutsforeachskidto12.4to
14.7N∙m(110to130in-lb).
AdjustingtheFlowBafe
Knob
ForMachineswithSideDischarge
Thisprocedureappliesonlytomachineswiththe
owbafeknob.Certainmodelshavenutsandbolts
insteadoftheowbafeknobthatyoucanadjustthe
sameway.
Youcanadjustthemowerdischargeowfordifferent
typesofmowingconditions.Positiontheknoband
bafetogivethebestqualityofcut.
1.Parkthemachineonalevelsurface,disengage
theblade-controlswitch,andengagetheparking
brake.
2.Shutofftheengine,removethekey,andwait
forallmovingpartstostopbeforeleavingthe
operatingposition.
3.Loosentheknob.
4.Slidetheknobtothedesiredposition.
5.Tightentheknob.
34