
Operator's Manual


AdjustingtheElectric
Clutch
ServiceInterval:Every500hours
Theclutchisadjustabletoensureproperengagement
andproperbraking.
1.Parkthemachineonalevelsurface,disengage
theblade-controlswitch,andengagetheparking
brake.
2.Shutofftheengine,removethekey,andwait
forallmovingpartstostopbeforeleavingthe
operatingposition.
3.Unlatchtheseatandtipitforward.
4.Loosenthefrontenginepanelknobsand
removethepanel.
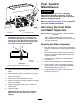
5.Pulluponthespring-loadedidlerpulleyforthe
PTO-drivebeltandremovethebeltfromthe
clutchpulley(Figure77).
g007167
Figure77
1.Spring-loadedidlerpulley3.PTO-drivebelt
2.Clutch4.Gearbox
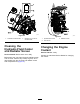
6.Unplugtheelectricconnectionfortheclutch
(Figure78).
7.Removethe2boltsholdingtherubberclutch
straptothemowerframe(Figure78).
8.Removethecenterboltholdingtheclutchto
theengineshaftandremovetheclutchandkey
(Figure78).
g007166
Figure78
1.Clutch4.Clutchcenterbolt
2.2boltsandnutsforclutch
strap
5.Electricalconnection
3.Rubberclutchstrap
9.Inserta0.381to0.533mm(0.015to0.021inch)
feelergaugethroughaninspectionslotinthe
sideoftheassembly(Figure79).
Note:Makesurethatitisbetweenthearmature
andtherotorfrictionsurfaces.
10.Tightenthelocknutsuntilthereisslightbinding
onthefeelergaugebutitcanbemovedeasily
withintheairgap(Figure79).
11.Repeatthisfortheremainingslots.
12.Checkeachslotagainandmakeslight
adjustmentsuntilthefeelergaugebetween
therotorandarmaturehasveryslightcontact
betweenthem.
g007168
Figure79
1.Slot
3.Feelergauge
2.Adjustingnut
13.Installtheclutchtotheengineshaftwiththekey.
14.Applythread-lockingadhesivetothecenterbolt.
15.Whileholdingthecrankshaftatthebackofthe
machine,installthecenterboltandtorqueitto
68N∙m(50ft-lb)(Figure78).
58