
Service Manual


Charge pump
Fig.31
Fig.29
104
103
102
Fig.32
45
129
Tightening torque
24.5±2.5Nm
Tightening torque
24.5±2.5Nm
Fig.30
24
23
23
24
105
39
128
126
X4
X5
X2
Tightening torque
19.6±1.9Nm
Tightening torque
19.6±1.9Nm
Tightening torque
9.8±1Nm
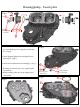
27.Install inner rotor(103) and outer rotor(104) onto
center case(3). [Fig.29]
28.Install two plugs(23), two O-rings(24), O-ring
(128), five O-rings(39) and two pins(126) into
pump body(100). And install four plugs(105) with
seal tape into pump body(100). [Fig.30]
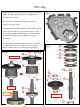
29.Install pump body assembly onto center case(3).
[Fig.31]
30.Install three bolts(45) and two bolts(129) into
pump body(100). [Fig.32]
*Put clean oil on all surfaces of charge pump rotors
(103)(104).
*Avoid damage of machined surfaces(center case(3)
and pump body(100)).
Pump body assembly
Pump body assembly
10
3