
Operator's Manual


14
Using the Headlights
Models 71242 and 71243 only
A dash-mounted On/Off switch (Fig. 2) controls the
headlights. The lights only shine while the engine is
running and the switch is On.
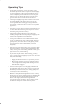
Using the Blade Control (PTO)
The blade control (PTO) lever engages and disengages
power to the blades.
Engaging the Blades
1. Depress the brake pedal to stop the tractor.
2. Shift the blade control (PTO) lever to Engage (Fig. 5).
m-1852
1
3
2
Figure 5
1. Disengage
2. Engage
3. Blade control (PTO) lever
Disengaging the Blades
1. Depress the brake pedal to stop the tractor.
2. Shift the blade control (PTO) lever to Disengage
(Fig. 5).
Setting the Height of Cut
Use the height-of-cut lever to raise and lower the mower to
the desired cutting height. You can set the cutting height to
7 different positions from approximately 1 to 4 in.
(25 to 102 mm).
1. Pull on the height-of-cut lever and shift it into the
desired position (Fig. 6).
m-1881
1
1 in. (25 mm)
1-1/2 in. (38 mm)
2 in. (51 mm)
2-1/2 in. (64mm)
3 in. (76 mm)
3-1/2 in. (89 mm)
4 in. (102 mm)
Figure 6
1. Height-of-cut lever
Adjusting the Mower Wheels
The front wheels on the mower guide the tractor over
uneven ground. You can adjust the height of the front
wheels to more closely match the cutting height selected for
the mower.
1. Remove the wheel mounting bolt and mount it into the
desired hole (Fig. 7).
1
2
3
4
m-1505
Figure 7
1. Wheel
2. Wheel bracket
3. Locknut
4. Wheel bolt
2. Use the top hole for the lowest cutting height and the
bottom hole for higher cutting heights (Fig. 7).
Starting the Engine
1. Sit down on the seat.
2. Set the parking brake; refer to Setting the Parking Brake
on page 13.
Note: The engine does not start unless you set the
parking brake or fully depress the brake pedal.
3. Shift the blade control (PTO) lever to Disengage
(Fig. 5).