
Operator's Manual


13
Operation
Note: Determine the left and right sides of the tractor from
the normal operating position.
Controls
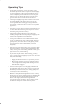
Become familiar with the controls (Fig. 2) before you start
the engine and operate the tractor.
1
2
3
4
5
6
7
8
9
11
10
Figure 2
1. Steering wheel
2. Light switch—on/off
(selected models)
3. Ignition switch
4. Clutch/brake pedal
5. Blade control (PTO) lever
6. Height-of-cut lever
7. Parking brake lever
8. Throttle lever
9. Hood opening
10. Operating-in-reverse light
11. KeyChoice
switch
Using the Parking Brake
Always set the parking brake whenever you stop the tractor
or leave it unattended.
Setting the Parking Brake
1. Push the brake pedal (Fig. 3) down and hold it.
1
2
m-1858
Figure 3
1. Brake pedal 2. Parking brake lever
2. Lift the parking brake lever (Fig. 3) up and gradually
take your foot off of the brake pedal.
Note: The brake pedal should stay in the depressed
(locked) position.
Releasing the Parking Brake
1. Push down on the brake pedal (Fig. 3).
Note: The parking brake lever should release.
2. Gradually release the brake pedal.
Positioning the Seat
The seat can move forward and backward. Position the seat
where you have the best control of the tractor and are most
comfortable.
1. Raise the seat and loosen the adjustment knobs (Fig. 4).
1
m-7010
Figure 4
1. Adjustment knobs
2. Move the seat to the desired position and tighten the
knobs.