
Service Manual


XL Lawn Tractor Service Manual 6 - 23
MOWER
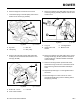
4. Carefully rotate blade(s) side to side (Figure 241).
Measure between the outside cutting edges and
the flat surface (Figure 241). If both
measurements are not within 3/16” (5mm), an
adjustment is required; refer to steps 5 and 6.
Figure 241
1078-1
5. Remove the hairpin cotter and washer from the
leveling bracket (Figure 242). To level the
blade(s), reposition the leveling bracket(s) in a
different hole and install the washer and hairpin
cotter (Figure 242). A front hole lowers the blade
height and a rear hole raises its height. Adjust
both sides as required.
Figure 242
1805-2
6. Check the front-to-rear blade slope; refer to
"Front-to-Rear Blade Slope" on page 6 - 23.
Front-to-Rear Blade Slope
Check the front-to-rear blade slope any time you install
the mower. Before you check the slope, set the air
pressure in the front and rear tires to the recommended
inflation. If the front of the mower is more than 3/16”
(5mm) lower than the rear of the mower, adjust the
blade slope using the following instructions:
1. Park the machine on a level surface, disengage
the blade control (PTO), set the parking brake,
stop the engine, and remove the ignition key.
2. Pull the wire off the spark plug.
3. Check and adjust side-to-side blade level if you
have not checked the setting; refer to "Side-to-
Side Mower Leveling" on page 6 - 22.
(A) Blades Side to Side
(B) Outside Cutting Edges
(C) Measure Here
(A) Hairpin Cotter & Washer
(B) Leveling Bracket
(C) Front Hole
(D) Rear Hole