
Service Manual


MOWER
A6-10 XL Lawn Tractor Service Manual
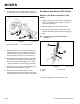
8. To adjust the front-to-rear blade slope, loosen the
front pivot plate mounting bolts slightly (Fig. A6 019).
Fig A6 019 fi g. 50 m-4634
9. Rotate the locknuts on the eyebolts to change the
adjustment (Fig. A6 019). To raise the front of the
mower, tighten the eye bolt locknuts. To lower the
front of the mower, loosen the eye bolt locknuts.
10. After adjusting both eyebolt locknuts evenly, check
the front-to-rear slope again. Continue adjusting
the eye bolts until the front blade tip is 0 to 3/8” (0
- 9mm) lower than the rear blade tip (Fig. A6 018).
11. When the front-to-rear slope is correct, tighten the
pivot plate mounting bolts (Fig. A6 019).
12. When the front-to-rear blade slope is correct,
recheck the side-to-side level of the mower; refer to
Leveling the Mower from Side-to-Side on page A6-7.
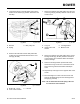
4. Move the height-of-cut lever into the A notch.
Fig A6 020 fi g. 35 m-1851
1. Park the machine on a level surface, disengage the
PTO, set the parking brake, stop the engine, and
remove the ignition key.
2. Move the height-of-cut lever into the D notch.
3. Remove the lift assist spring between the mower
right side lift bracket and the retaining bolt (Fig. A6
020).
Note: Use the spring tool provided with the
machine.
A. Pivot mounting bolt B. Eyebolt locknut
A
B
A
B
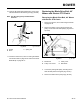
44” Mower with Electric PTO Clutch
Removing 44” Mower with Electric PTO
Clutch
A. Spring C. Spring tool
B. Bolt
A
B
C