
Operator's Manual


8.Releasethedrumlatchanddumpthedrum;referto
DumpingtheDrum(page24).
UsingtheDrum
DANGER
Contactwiththemixingpaddlescouldcause
damageorinjury.
Neverputyourhandsinsidethedrumwhilethe
engineisrunning.
DumpingtheDrum
Note:Whendumpingabatchofmaterial,leavetheengine
runningandtheclutchintheOnpositionsotherotating
paddleshelpdischargethematerial.
1.Alignawheelbarroworsimilarcontainerofadequate
capacityinthepathofthedrumopening.
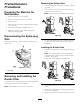
2.Graspthedumphandlewithyourlefthand(Figure40).
1
2
3
4
G019972
Figure40
1.Dumphandle(mix
position)
3.Drumlatch(locked
position)
2.Drumlatch(release
position)
4.Dumphandle(dump
position)
Note:Whendumpingabatchofmaterial,aligna
wheelbarroworasimilarcontainerofadequatecapacity
beneaththechute.
3.Liftthehandleofthedrumlatch(Figure40).
4.Withbothhandsonthedumphandle,rotateit
counterclockwisetodischargethecontentsofthe
drum(Figure40).
Note:Allowthemachinetocompletelydischargethe
contentsofthedrum.
5.Rotatethedumphandleclockwiseuntilthedrum
latchlocksthedrumintheuprightposition(Figure40).
6.Afterdischargingabatchofmaterial,cleanthedrum;
refertoCleaningtheDrum(page24).
Note:Thisstepwillcleanthepaddlesanddrum
betweenbatchesandpreventdriedmaterialfrom
forming,andcontaminatingthenextbatchofmaterial.
CleaningtheDrum
Important:Donotstrikeonthedrumwithashovel,
hammer,oranyotherdevicetoloosenanyaccumulated
driedmaterials.
1.Stoptherotationofthepaddlesbymovingtheclutch
levertotheOffposition;refertoControllingthe
Paddles(page22).
2.RotatetheengineOn/OffswitchtotheOffposition;
referto
StoppingtheEngine(page22).
3.Ensurethatthedrumisinthemixposition(upright);
refertoDumpingtheDrum(page24),step5.
4.Spraythemachinewithwatertoremoveany
accumulatedmaterial.
5.Starttheengine;refertoStartingtheEngine(page21).
6.Starttherotationofthepaddlesbymovingtheclutch
levertotheOnposition;refertoControllingthe
Paddles(page22).
7.Dumpthedrum;refertoDumpingtheDrum(page
24).
AdjustingthePaddleBlades
Note:Adjustingthepaddlebladesisoptional.
1.Stoptheengineandwaitforallmovingpartstostop.
2.Disconnectthewirefromthesparkplug;referto
DisconnectingtheSpark-plugWire(page28).
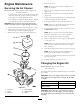
3.Removethenutsandboltsthatsecurethegratetothe
drum,andremovethegrate(Figure41,Figure42,or
Figure43).
24