
Operator's Manual


2.Inserttheconnectinglinkthroughthechainlinkuntil
theconnectinglinksnapsclosed.
3.Repeatsteps1and2toinstalltheotherconnectinglink
intheotherendofthesafetychain.
4
InstallingtheLightAssembly
Partsneededforthisprocedure:
1
Grommet
1Firtreeclip
5
Cableclamp
2Bracket
1Licenseplateholder
1
Leftlightassembly
1Rigtlightassembly
2Frontlightassembly
11Nuts
7
Bolts
4Edgeclips
1Wiringharness
2
Grommet,small
5
Cableties
InstallingtheRearLightAssemblies
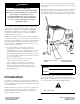
1.Installthebracketsontotheframeusing4bolts,2
cableclamps,and4nutsasshowninFigure6.
Note:Thecableclampsshouldbeinstalledonthe
boltsclosertothemiddleofthemachine.
Figure6
Rightbracketshown
1.Nut3.Bracket
2.Cableclamp
4.Bolt
2.Placethelicenseplateholderontotheleftlamp
assemblyandsecurethemtotheleftbracketusing2
nutsasshowninFigure7.
Note:Placetheterminalforthewiringharnessonthe
outsideprongofthewiringharnessbeforesecuringthe
nut(Figure7).
g0278 56
Figure7
1.Edgeclip4.Licenseplateholder
2.Wiringharness
5.Leftlightassembly.
3.Firtree(attachedtowiring
harness)
3.Insertthertreethatisattachedtothewiringharness
totheopenholeonthebracket(Figure7).
4.Securethewiringharnesstothesideofthemachine
usinganedgeclip(Figure7).
5.Attachtherightlightassemblytotherightbracketas
showninFigure8using2nuts.
Note:Placetheterminalforthewiringharnessonthe
outsideprongofthewiringharnessbeforesecuringthe
nut(Figure8).
Figure8
6.Insertthertreethatisattachedtothewiringharness
totheopenholeonthebracket(Figure8).
7.Securethewiringharnesstothesideofthemachine
usinganedgeclip(Figure8).
10