
Operator's Manual


3
1
2
4
5
6
7
8
g020663
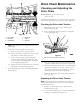
Figure38
1.Motorpulley
5.Idlershaft
2.Idlerpulley6.Jamnut
3.Belt
7.Setscrew
4.Beltguide
8.Straightedge
E.Ifneeded,pivotthemotoronthemotordeck
untilthemotorpulleyandtheidlerpulleyare
alignedtothestraightedge(Figure38).
F.Tightenthenutsandboltsthatsecurethemotor
tothemotordecktoatorqueof18N-m(13ft-lb).
G.Checktheairgapbetweenthemotordeckand
therollerontheclutch.Iftheairgapisnotwithin
thespeciedrange,repeatstep3untiltheairgap
measurementiswithinthespeciedrange.
H.Installthedividerplate;refertoInstallingthe
DividerPlate(page23).
Important:Ensurethatthepaddlesdonotrotatewhen
theclutchleverisintheOffposition.
ReplacingtheBelts
ServiceInterval:Every2years—Replacethebelts.
RemovingtheBelts
1.MovetheclutchlevertotheOffposition;referto
ControllingthePaddles(page19).
2.Removethedividerplate;refertoRemovingthe
DividerPlate(page22).
3.Removethenutthatsecuresthebeltguidetothe
motor,andremovethebeltguide(Figure39).
2
1
G021601
Figure39
1.Nut2.Beltguide
4.Sliptheforwardbeltforwardandofftheidlerpulley
(Figure40).
2
3
4
1
G021608
Figure40
1.Motorpulley3.Idlerpulley
2.Forwardbelt4.Rearbelt
5.Sliptherearbeltrearwardandofftheidlerpulley
(Figure40).
6.Slipthebeltsoffthemotorpulley.
7.Removethebeltsfromthemachine.
InstallingtheBelts
1.EnsurethattheclutchleverisintheOffposition;refer
toControllingthePaddles(page19).
2.Aligntherearbelttothereargrooveinthemotor
pulley.
Note:Donotaligntherearbelttotheidlerpulley.
3.Aligntheforwardbelttotheforwardgrooveofthe
idlerpulley.
26