
Operator's Manual


13
Attaching the Grass Deflector
Attaching the grass deector differs depending on the type
of trimmer: curved shaft or straight shaft.
WARNING:
The line cut-off blade on the grass deector
is sharp. Avoid contact with the blade. Failure
to avoid contact can result in serious personal
injury.
WARNING:
Always attach the grass deector prior to
operating trimmer. Failure to attach the grass
deector may result in debris being thrown at
the operator and result in serious injury.
To Attach the Curved Shaft Grass Deflector
Model No. 51955
See Figure 4.
Follow these steps to attach the curved shaft grass deector.
1. Remove the hex head cap screw, at washer, lock
washer, and wing nut from the grass deector.
2. Press the grass deector onto the bottom of the curved
shaft as shown.
3. Insert the hex head cap screw through the grass deec-
tor bracket.
4. Place the at washer and lock washer on the hex head
cap screw.
5. Place the wing nut on the hex head cap screw and turn
clockwise to secure.
Figure 5
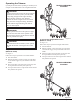
To Attach the Straight Shaft Grass Deflector
Model No. 51975
See Figure 5.
Follow these steps to attach the straight shaft grass deector.
1. Remove the bolt from the grass deector.
2. Insert the tab on the mounting bracket in the slot on the
grass deector.
3. Align the screw hole in the mounting bracket with the
screw hole in the grass deector.
4. Insert the bolt through the mounting bracket and into
the grass deector.
5. Tighten the bolt securely using a at blade screwdriver
or 5/16 in. wrench.
Assembly
Straight Shaft
Grass Deflector
Tab
Slot
Figure 4
Curved Shaft
Grass Deflector
Wing Nut
Line Cut-off
Blade
Lock
Washer
Hex Head
Cap Screw
Flat
Washer
Bracket
Bolt
Grass
Shield