
Operator's Manual


6
1.
Place the charger against the wall and mark the two
hole locations, through the top of the keyholes in the
charger.
2.
Drill pilot holes as follows:
•
If installing the char
ger on wall board, plaster
, or
cement, drill two holes for the wall anchors (as
indicated by the wall anchor manufacturer) at the
marked locations.
•
If installing the char
ger on wood, drill two holes,
slightly smaller than the diameter of the screw
threads, at the marked locations.
3.
If installing the char
ger on wall board, plaster
, or
cement, insert the two wall anchors into the holes
(Fig. 4).
4.
Hold the char
ger against the wall and drive the screws
into the wall anchors or holes (Fig. 4).
m–4092
2
1
3
Figure
4
1. Wall
anchors
2. Screws
3. Charger
Operation
IMPORTANT:
Befor
e using your trimmer
, r
ead the
Important Safety Instructions in the Safety section;
r
efer to page 3.
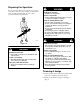
Features
Compare the features illustrated in Figure 5 with your
trimmer to familiarize yourself with it.
7
m–4091
2
3
4
5
6
1
Figure
5
1. Battery
compartment
2.
Rear handle
3. Lock–of
f button
4.
Front handle
5. Guard
6. Blade
7. Trigger
Battery
The
battery powers the trimmer
.
Handles
Use the front and rear handles to hold the trimmer during
operation.
Lock-off Button
The
lock-of
f button reduces the possibility of accidental
starting. Y
ou must press the lock–of
f button before you
can squeeze the trigger
. The lock–of
f button resets each
time the trigger is released.
Trigger
T
o turn on the trimmer
, press and hold the lock-of
f button,
squeeze the trigger
, then release the lock-of
f button.
Release the trigger to turn of
f the trimmer
.
WARNING
POTENTIAL HAZARD
•
If the trigger is pr
essed, the trimmer will be
running.
WHA
T CAN HAPPEN
•
Accidental starting of your trimmer could
r
esult in serious personal injury
.
HOW T
O A
V
OID THE HAZARD
•
Only squeeze the trigger when you have both
hands on the handles and ar
e r
eady to operate
the trimmer
.