
Service Manual


Multi Pro 5800Hydraulic System Page 5 − 78
Boom Lift Manifold Service
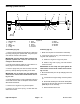
Figure 65
1. Manifold
2. Solenoid valve (S2) (RH boom)
3. Solenoid coil (S1)
4. Coil spacer (2 used)
5. Solenoid valve (S3) (LH boom)
6. Nut
7. Solenoid valve (S1)
8. Check valve PC1
9. Solenoid coil (S3) (LH boom raise)
10. Solenoid coil (S3) (LH boom lower)
11. Solenoid coil (S2) (RH boom raise)
12. Solenoid coil (S2) (RH boom lower)
13. Nut (2)
14. Check valve PC2
20 ft−lb
(27 N−m)
60 in−lb
(7 N−m)
2
10
8
1
5
7
4
12
11
9
4
60 in−lb
(7 N−m)
20 ft−lb
(27 N−m)
20 ft−lb
(27 N−m)
FRONT
FRONT
13
20 ft−lb
(27 N−m)
14
6
3
20 ft−lb
(27 N−m)
1
The ports on the boom lift control manifold are marked
for easy identification of components. Example: P is the
gear pump connection port and S1 is the location for so-
lenoid valve S1 (see Hydraulic Schematic in Chapter 8
− Foldout Drawings to identify the function of the hydrau-
lic lines and cartridge valves at each manifold port).
If sprayer is equipped with optional Sonic Boom System,
the boom lift control manifold will be different than the
manifold shown in Figure 65 (see Ultra Sonic Boom Lift
Manifold Service in Chapter 9 in this manual). Service
of the Sonic Boom System boom lift control manifold is
similar to the standard manifold.
Boom Lift Control Manifold Service (Fig. 65)
NOTE: The five (5) solenoid valve coils on the boom lift
control manifold are identical. To assist in troubleshoot-
ing, identical coils can be exchanged. If the problem fol-
lows the exchanged coil, an electrical problem likely
exists with the coil. If the problem remains unchanged,
something other than the solenoid coil is the problem
source (e.g. a hydraulic problem exists).
IMPORTANT: A flow control orifice (0.035) is placed
beneath the hydraulic fittings in control manifold
ports C1, C2, C3 and C4. If any of these fittings is re-
moved from the manifold, make sure to remove ori-
fice and label its position for assembly purposes.
Also note location of slot in orifice for assembly pur-
poses.