
Operator's Manual


7.Checktheair-lterelementforexcessive
accumulationofdust,dirt,anddebris(Figure
73).
Note:Donotcleantheair-lterelementifitis
dirty;replacetheair-lterelementifitisdirty.
8.Installthedustcapontotheair-cleanerbodyand
securethecapwiththe2latches(Figure73).
Note:Ensurethatthedustvalvealigns
betweenthe5to7o’clockpositionwhenviewed
fromtheend.
9.Lowerthepassengerseat.
ReplacingtheAir-Filter
Element
ServiceInterval:Every100hoursReplacethe
air-lterelementmoreoftenindusty,
dirtyconditions.
1.Ifyouareinstallinganewlter,inspectthenew
air-lterelementforshippingdamage,including
thesealingendofthelter.
Important:Donotinstalladamagedlter.
2.Cleanthedustcapandair-cleanerbody(Figure
73).
3.Liftthecoolant-overowtankupandoffthe
tank-supportbracket(Figure74).
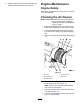
g032541
Figure74
1.Coolant-overowtank5.Air-lterelement
2.Tank-supportbracket
6.Dustvalve(5to7o’clock
position)
3.Latch(dustcap)7.Pressure-reliefhose
4.Dustcap8.Tank-venthose
4.Loosenthe2latchesthatsecurethedustcapto
theair-cleanerbody(Figure74).
5.Gentlyslidetheoldlterelementoutofthe
air-cleanerbodytoreducetheamountofdust
dislodged.
Note:Avoidknockingthelterelementagainst
theair-cleanerbody.
6.Cleantheinsideofthedustcap,air-cleaner
body,anddustvalvewithadamprag(Figure
73andFigure74).
7.Inserttheair-lterelementintotheair-cleaner
body(Figure74).
Note:Ensurethatthelterisseatedinthe
air-cleanerbodyproperlybyapplyingpressure
totheouterrimofthelterelementwhenyou
installit.Donotpressontheexiblecenterpart
ofthelter.
56