
Operator's Manual


g033578
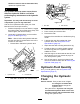
Figure110
1.Screenvane2.Suctionlter
5.Installthenewsuctionlterintothelterhousing.
Note:Ensurethatthelterisfullyseated.
6.Alignthehoseandhosettingtothelter
housingatthetopofthetank,andsecurethe
ttingandhousingwiththeretainerthatyou
removedinstep2.
ChangingthePressure
Filter
ServiceInterval:Every400hours
1.Movethemachinetoalevelsurface,shutoffthe
spraypump,shutofftheengine,andremove
thekey.
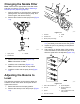
2.Alignadrainpanunderthepressurelter
(Figure111).
g028235
Figure111
1.Filterhead4.Bowl
2.O-ring(bowl)5.O-ring(drainplug)
3.Filterelement6.Drainplug
3.Rotatethedrainplugcounterclockwiseand
removeitfromthebowlofthepressurelter
(Figure111).
Note:Allowthebowltodraincompletely.
4.Rotatethebowlcounterclockwiseandremoveit
fromitslterhead(Figure111).
5.Removetheoldpressure-lterelement(Figure
111).
Note:Discardtheoldlter.
6.ChecktheO-ringforthedrainplug(located
insidethebowl)andtheO-ringforthebowl
(locatedinsidethelterhead)fordamageand
wear(Figure111).
Note:ReplaceanydamagedorwornO-rings
fortheplug,bowl,orboth.
7.Installthenewpressure-lterelementintothe
lterhead(Figure111).
Note:Ensurethatthelterelementisrmly
seatedintothelterhead.
8.Installthebowlontothelterheadandtighten
byhand(Figure111).
9.Installtheplugintothebowlandtightenbyhand
(Figure111).
77