
Operator's Manual


8
OPERATING INSTRUCTIONS
BEFORE STARTING THE ENGINE TO BEGIN
THE DAYS SPRAYER APPLICATION:
1. Check the engine crankcase oil.
2. Check the Air Cleaner.
3. Check cooling air intake areas.
4. Check the fuel tank.
TAKE MACHINE TO WORK SITE:
1. Pull the Idler Engagement Chain to bring the
Idler Pulley into contact with the Drive Belt. At the
point of resistance by the Drive Belt, pull the Chain
the distance of another two links and insert that
link into the lug on the Skid Frame.
2. Fill the Sprayer Tank.
IMPORTANT! DO NOT add chemical to the
Tank until just before use. Instructions on the
chemical manufacturers container labels,
regarding mixing proportions, should be read
and STRICTLY followed. The concentrate
should not be poured into an empty Tank. Fill
the Tank about one-half full with clean, clear
water, add chemical concentrate and then
finish filling the Tank with water.
3. OPEN the Suction Line Valve and Agitator
Valve. See FIG. 2 on page 6.
START THE SKID SPRAYERS ENGINE:
1. Open the fuel shut-off valve.
2. For a Cold Engine: Place the throttle control
midway between the slow and fast positions.
Place the choke control into the on position.
Gradually return the choke control to the off
position after the engine starts and warms up. See
FIG.6.
For a Warm Engine: (normal operating
temperatures) Place the throttle control midway
between the slow and fast positions. Place the
choke control into the off position.
3. Pull the Starter Handle with a smooth, steady
motion. Pull the handle straight out to avoid
excess rope wear.
NOTE: The TORO Skid Sprayer is designed to
operate most effectively with the engine at full
or nearly full 3,600 RPM.
STOPPING THE ENGINE:
1. Move the throttle control to the off position.
2. Close the fuel shut-off valve. See FIG. 6.
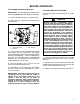
FIG. 6
1. Throttle Control 3. Starter Handle
2. Choke Control 4. Oil Sentry
5. Fuel Shut-off Valve
SPRAYING:
1. Place the Master ON/OFF Switch, on the Spray
Control Console, at ON.
2. Use the individual Boom Switches to activate
the Boom Section (or Sections) to be used in the
sprayer application.
3. Regulate the pressure with the Pressure
Adjust Switch.
WHEN JOB IS COMPLETED:
Flush the entire spraying system with clear water
and flushing agent after each spray job. Failure to
clean the system can result in a chemical residue
which will seriously damage the Pumps and plug
the Control Valve, Hoses and Nozzle Tips.
Wash spray tips thoroughly with water or a
cleaning solution that is appropriate for the
chemical used. Blow out the orifice, clean and dry.
If orifice remains clogged, clean it with a soft
bristled brush...never use a metal object.