
Operator's Manual


53
Pump Housing Disassembly
1. Using a 9/16" box end wrench, remove the four
hex-head bolts holding the pump to the mounting
flange. (If necessary, tap pump casing discharge
port with rubber mallet or hammer to separate.)
2. To remove the impeller nut, insert a large
screwdriver or file (at least 10" long) into impeller
vanes to prevent impeller from turning when
loosening nut. Use a 5/8" socket wrench to remove
the impeller nut by turning it counterclockwise. See
Fig.46.
Clean-Up Of Pump Housing
1. Using a bottle-type wire brush with air of hand
drill, clean the discharge port, suction port and
the sealing areas of the O-ring on the Pump Casing
and mounting flange. Using the port brush, clean
the seal cavity in the mounting flange.
2. After wire brush cleaning, it is recommended
that the Pump Casing and mounting flange be
further cleaned in a solvent tank to remove rest
and corrosion particles.
Seal Replacement/Pump Housing Reassembly
1. Lubricate seal cavity in mounting flange with
mineral oil or glycerin.
2. Install the stationary portion of the mechanical
seal by sliding over the shaft with the ceramic side
out.
IMPORTANT: Make sure both seal cavity and
seal are clean and lubricated.
3. To seat the seal in the seal cavity, use a piece
of 3/4" PVC pipe 4" to 6" in length.
4. To install the rotary portion of the mechanical
seal, place it over the shaft with the carbon side
facing in, and press until it bottoms out against
the stationary portion. See Fig. 47.
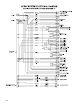
PUMP MAINTENANCE
Figure 46
3. Once nut is removed, place a screwdriver on
each side (as in Fig. 46) behind the impeller and
pry away from the mounting flange. Remove
woodruff key from the shaft. Remove O-ring from
the mounting flange.
Pump Seal Removal
1. Lightly lubricate shaft with mineral oil or
glycerin for easier removal of seal.
NOTE: In the case of a severe pump seal leak,
check the shaft ball bearing in the hydraulic
motor for possible contamination.
2. Using a 1/2" box end wrench, remove the four
bolts holding the motor to the mounting flange.
Remove motor.
3. Using a screwdriver and hammer, tap out the
stationary portion of the mechanical seal from the
motor side of the mounting flange. (If motor is not
removed, seal can be pried out with a small
screwdriver. CAUTION: The seal will be damaged
by removal in this manner. A new seal must be
used when Pump is reassembled.)
NOTE: This step is NOT required if servicing
only the hydraulic motor.
Figure 47
5. Install rubber gasket over shaft against rotary
portion of seal.
6. Insert woodruff key into shaft key slot. Place
impeller on shaft. Put impeller nut on shaft end
and, using a large screwdriver or file in the impeller
vanes for support, tighten impeller nut securely.
7. Install O-ring on mounting flange. Replace O-
ring if worn or damaged.
8. Place Pump casing on mounting flange, insert
and tighten bolts.