
Operator's Manual
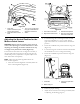


SharpeningtheBlades
1.Usealetosharpenthecuttingedgeatbothendsof
theblade(Figure65).Maintaintheoriginalangle.The
bladeretainsitsbalanceifthesameamountofmaterial
isremovedfrombothcuttingedges.
Figure65
1.Sharpenattheoriginalangle
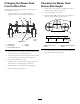
2.Checkthebalanceofthebladebyputtingitonablade
balancer(Figure66).
Note:Ifthebladestaysinahorizontalposition,the
bladeisbalancedandcanbeused.Ifthebladeisnot
balanced,lesomemetalofftheendofthesailarea
only(Figure63).
3.Repeatthisprocedureuntilthebladeisbalanced.
Figure66
1.Blade2.Balancer
InstallingtheBlades
1.Installthebladeontothespindleshaft(Figure63).
Important:Thesailpartoftheblademustbe
pointingupward,towardtheinsideofthemower
toensurepropercutting(Figure63).
2.For48–inchmowerdecks,installtheblade,curved
washer,andthebladebolt(Figure63).
3.For52-nchmowerdecks,installtheblade,stiffener,
curvedwasher,andthebolt(Figure64).
4.Torquethebladeboltto115to140N-m(85to110
ft-lb).
CorrectingtheMowerQuality
ofCut
Ifonedeckbladecutslowerthantheother,correctasfollows.
Note:Tireairpressureiscriticalintheseprocedures.Make
surealltireshavethecorrectpressure.
1.DisengagethePTOandsettheparkingbrake.
2.Stoptheengine,removethekey,andwaitforallmoving
partstostopbeforeleavingtheoperatingposition.
3.Disconnectthesparkplugwire(s)fromthespark
plug(s).
4.Adjustthetirepressureinthereartirestospecications.
5.Checkthatthebladesandspindleshaftsarenotbent;
referto
CheckingforBentBlades(page44).
6.Settheheight-of-cuttothe101.6mm(4inches)
position;refertoAdjustingtheHeight-of-Cut(page
19).
7.PerformthestepsinSettinguptheFrame(page47).
46