
Operator's Manual


BrakeMaintenance
ServicingtheBrakes
ServiceInterval:Beforeeachuseordaily—Checkthebrakes
onbothalevelsurfaceandslope.
Alwayssettheparkingbrakewhenyoustopthemachine
orleaveitunattended.Iftheparkingbrakedoesnothold
securely,anadjustmentisrequired.
CheckingtheBrakes
1.Parkthemachineonalevelsurface,disengagethePTO.
2.Stoptheengine,removethekey,andwaitforallmoving
partstostopbeforeleavingtheoperatingposition.
3.Applytheparkingbrake.Thewheelsmustlockwhen
youtrytopushthemachineforward.
4.Ifthewheelsdonotlock,adjustthebrakes.Referto
AdjustingtheBrakes.
5.Releasethebrakeandpressuppercontrolbarvery
lightly,approximately1/2inch(13mm).Thewheels
shouldrotatefreely,ifnot;refertoAdjustingthe
Brakes.
AdjustingtheBrakes
Thebrakeleverisontheuppercontrolbar.Iftheparking
brakedoesnotholdsecurely,anadjustmentisrequired.
Note:Fortheinitialadjustment,adjustthewingnutuntilit
is1-1/4inchesfromthetopoftherod(
Figure46).
1.Parkthemachineonalevelsurface,disengagethe
PTO,andsettheparkingbrake.
2.Stoptheengine,removethekey,andwaitforallmoving
partstostopbeforeleavingtheoperatingposition.
3.Checkthebrakebeforeyouadjustit;refertoChecking
theBrakes.
4.Releasetheparkingbrake;refertoReleasingthe
ParkingBrake.
5.Toadjustthebrakeremovethehairpincotterand
washerfromthebrakeleverandtrunnion(
Figure46).
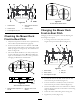
Figure46
1.Hairpincotterandwasher5.HoleF
2.Trunnion
6.Initialadjustment-1-1/4
inch(32mm)
3.Brakelever7.Rod
4.Wingnut
6.Rotatethewingnutclockwisetoincreasethebraking
pressure.
7.Rotatethewingnutcounterclockwisetodecreasethe
brakingpressure.
8.InstallthetrunnionintoholeF(Figure46).Tighten
thewingnut.
9.Securetrunniontobrakeleverwithwasherandhair
pincotter(Figure46).
10.Checkthebrakeoperationagain;refertoChecking
theBrakes.
Important:Withtheparkingbrakereleased,the
rearwheelsmustrotatefreelywhenyoupushthe
mower.Ifbrakeactionandfreewheelrotation
cannotbeachievedcontactyourservicedealer
immediately.
32