
Service Manual


SECTION
11
CONTROL PANEL AND HANDLES
CAUTION! Servicing the Power Shift Snowthrower will
require working with some of the moving parts. To
prevent accidental starting of the engine while
performing service, take the following precautions:
Rotate the ignition key to
off
and remove.
Pull the wire
off
the spark plug.
Make sure the wire does not accidentally touch
the spark plug.
CAUTION! The Power Shift Snowthrower has the
feature of being able to be stood on the front housing
for service and storage. Always drain the fuel from the
tank prior to such service taking the following
precautions:
Drain it outdoors and make sure the engine is cool.
Wipe
up
any gasoline that may have spilled.
Do not drain the gasoline near any open flame or
Do not smoke when handling gasoline.
spark.
CONTROL PANEL
Control Panel Operation
The control panel is an important component in the
Powershift, as
it
houses the key switch, the chute,
directional control the control box, as well as providing
a place for instructions.
It
can
be
serviced relatively
easily by using the following procedure:
Control Panel Removal
1.
2.
3.
4.
5.
Stand the snowthrower on the front housing
so
that the handle grips are vertical.
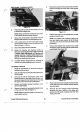
Remove the cover on
the
right handle as shown
in Figure
106.
Drive the
roll
pin from the upper chute rod gear
and pull
the
chute control
rod
out through the top
of the control panel. Be careful not to lose the
rubber washer.
Release the connector from the bottom of the
ignition switch by pressing on the tabs near the
end of the terminals and pulling the connector
off.
Squeeze the
two
tabs on the ignition switch then
pull the ignition switch
out
through the top of the
control panel.
Control Panel and Handles
Figure
106
6.
Remove the nut securing the lower shift
rod
to the
shift
bracket as shown
in
Figure
107.
Figure
107
7.
Remove the shift knob from the shift lever.
Twisting the shift knob will facilitate removal.
8.
Remove the four nylon locknuts securing the
control box to the control panel and remove the
control box (set the control box on top of the
recoil, being careful not to damage
or
bend the
reverse
or
latch cables).
9.
Remove the
two
capscrews and
two
self-tapping
screws securing the control panel to the handles
and remove the control panel. Refer to Figure
107.
10.
If
necessary, remove the chute control
rod
bearing
from the control panel.
Control Panel Installation
See Figure
108.
1.
Stand the snowthrower on the front housing to
facilitate servicing of the control panel.
80
Power Shift Snowthrowers