
Service Manual


Right Handle Installation (cont'd)
8.
9.
10.
11.
12.
13.
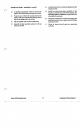
Figure
113
Press the push nut onto the end of the cross rod
to secure the impeller lever.
NOTE: Make sure the tab on the push nut is at
90"
to the keyway to insure proper retention
Secure the control panel to the handle using the
flanged head capscrew and self-tapping screw.
If the locking latch and the locking latch spring
were removed, install now. Secure with the
E
clip.
Refer to Figure
113
above.
Secure the cables with
two
cable ties.
Adjust the impeller and traction cables as
described under Traction and Impeller Controls
Traction Cable Adjustment and Traction and
Impeller Controls Impeller Cable Adjustment,
page
49.
Install the cover plate on the right handle
with the
two
small machine screws.
Complete handle replacement by checking all
controls and making adjustments as required.
Left Handle Removal
1.
Stand the snowthrower on the front housing to
facilitate handle removal.
2.
Snip the cable ties securing the wiring harness to
the left handle.
3.
Drive out the roll pin securing the upper chute
directional gear to the upper chute control rod.
Remove the gear and the rubber washer, then pull
the upper chute rod from the control panel.
4.
Remove the impeller locking mechanism cover
from the right handle.
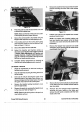
to the cross rod. Refer to Figure
114.
NOTE: Flattening the locking tabs on the push nut
may facilitate removal.
5.
Remove the push nut securing the impeller lever
6.
Remove the small hex head capscrews and nylon
locknuts securing the cross rod to the traction
lever.
Figure
114
7.
Pull the cross rod from
the
impeller lever control
panel and traction lever.
NOTE: The release cam, impeller bushing, trip
lever and traction lever spacer will all be
loose
once the cross rod is removed. Be careful not to
loose them.
8.
Remove the flanged head capscrew and small
self-tapping screw securing the
left
handle to the
control panel. See Figure
115.
Figure
115
9.
Remove the four nylon locknuts securing the rear
cover plate to the lower handle brackets and the
rear cover plate.
10.
Remove the two flanged head capscrews
securing the lower handle to the frame and
remove the left handle complete with the front
chute control rod.
Power Shift Snowthrowers
83
Control Panel and Handles