
Operator's Manual


14
6. Install
the new scraper to the housing using the
carriage bolts and locknuts.
Replacing
the Drive Belt
Inspect
the drive belt before each season, and replace it if
it is worn or damaged.
1.
Stop the engine.
2.
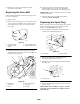
Remove three self tapping screws, two capscrews, one
washer
, and two locknuts that secure the belt cover to
the snowthrower frame (Fig. 17). Set the drive belt
cover aside.
1
2
3
4
631
Figure
17
1. Cap screw
, locknut
2. Capscrew
, locknut,
washer
3.
Long self tapping screw
4.
Short self tapping screws
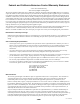
3. Push
down on the idler pulley and remove the drive
belt from the rotor pulley
, the brake arm assembly, and
the engine pulley (Fig. 18).
4
2
1
6
3
5
626
Figure
18
1. Engine
pulley
2.
Idler pulley
3. Roller
4.
Brake arm assembly
5.
Rotor pulley
6.
Belt guide
4. Loop
the new drive belt around the engine pulley
,
under the idler pulley
, over the roller
, through the
brake assembly
, and around the rotor pulley (Fig. 18).
IMPORTANT:
The drive belt must be on top of the roller
as shown in Figure 18.
5.
Install the drive belt cover
. T
ighten the fasteners
securely
, but
do not overtighten
.
Replacing
the Spark Plug
Before
each season, check the spark plug. If the electrodes
in the center of the plug are dark or have deteriorated,
install a new NGK BPMR4A spark plug.
1.
Remove the three mounting screws that secure the
control panel to the housing (Fig. 19).
643
1
2
Figure
19
1. Control
panel
2.
Mounting screws
2. Remove
the ignition key and lift of
f the panel,
allowing it to hang on the recoil rope.
3.
Pull the wire of
f the spark plug and remove the spark
plug (Fig. 20).
1
628
Figure
20
1. Spark
plug wire
4. Examine
the spark plug and replace it if it is cracked,
fouled, or dirty
.
IMPORTANT
: Do not sandblast, scrape, or clean the
spark plug. Dirt may fall into the cylinder and cause
engine damage.