
Operator's Manual


g300592
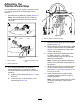
Figure75
1.Clutchwireharness
3.Bolt,washer,andnut
2.Metalandrubberstraps
3.Removethebolt,washer,andnutfromthemetal
andrubberstraps(Figure75)ontheframe.
Aspaceriscontainedintherubberstrap;ensure
thatthisisnotmisplaced.
4.Haveanassistantusearatchettorelease
tensionfromthebelt,thenremovethebeltfrom
thepumppulley,idlerpulley,andenginepulley.
5.Movethebeltovertheclutchandforwardonthe
PTOshaft.
InstallingtheTractionBelt
1.MovethebeltalongthePTOshaft,overthe
clutch,andontotheenginepulley.
2.Haveanassistantusearatchettopulltheidler
pulleydown.
3.Routethebeltontheenginepulley,idlerpulley,
andpumppulley(Figure74).
4.Removetheratchetfromtheidlerarm.
5.Ensurethattherubber-strapspacerisin-place.
6.Usethepreviouslyremovedbolt,washer,and
nuttosecuretheendofthemetalandrubber
strapstotheframe.
7.Plugintheclutch-wire-harnessconnectortothe
machinewireharness.
ControlsSystem
Maintenance
AdjustingthePTO-Clutch
Gap
ServiceInterval:Every200hours
1.Allowtheenginetocool.
2.Raisetheenginehood.
3.Adjusttheairgapsothata0.3mm(0.012inch)
feelergaugeslidesinbetweentheclutchlining
andfrictionplatewithlightpressure(Figure76).
Note:Youcandecreasethegapbyturning
theadjustingnutsclockwise(Figure76).The
maximumservicegapis0.6mm(0.024inch).
Adjustall3airgapsto0.4mm(0.012inches).
g299611
Figure76
1.Clutch3.0.3mm(0.012inch)air
gap(3)
2.Adjustingnut(3)
4.Afterthe3airgapsareadjusted,checkall3
again.
Note:Adjusting1airgapcanaltertheother
gaps.
63