
Service Manual


InstallingtheFrontCover(continued)
7.Attachtheoilpantothefrontcoverwiththe5ange-headscrews.Torque
thescrewsto19N∙m(14ft-lb).
8.Installthecrankshaftpulley:
IMPORTANT
Wheninstallingthecrankshaftpulley,ensurethatyoudonotdamage
thetonewheelthatisattachedtotherearsideofthepulley.
A.Insertthewoodruffkeyintothecrankshaftslot.
B.Carefullyslidethepulleyontothecrankshaft.
Note:Ensurethatyoudonotdamagetheoilsealinthefrontcover.
Ensurethatthekeyslotinthepulleyisalignedwiththewoodruffkeyin
thecrankshaft.
C.Installthemountingplate(item18inFigure33)andbolt(item19inFigure
33)tothepulleyandcrankshaft;torquetheboltto372N∙m(274ft-lb).
Note:Useanappropriateholdingtooltopreventthepulleyand
crankshaftfromturning.
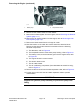
9.Attachtheelectricalcomponentstothefrontcover(Figure34)asfollows:
A.Positionthewireharnessandsensorstothefrontcover.
B.ApplyalightlmofcleanoiltotheO-ringsofthecrankshaftposition
sensorandcamshaftpositionsensor.Carefullyinstallthesensorsinto
thefrontcoverwiththescrews.
C.Attachtheelectricalharnessclampstothefrontcover.
10.Attachtherearaxlepivotshafttotheframe;refertoRemovingtheRear
Axle(page6–27).
A.Slidetheaxlepivotshafttowardthefrontofthemachine.
Note:Ensurethattherollpinonthepivotshaftispositionedintheframe
reliefs.
B.Installthethrustwasherandlocknutontothepivotshaft.
C.Tightenthelocknuttopreventanyaxialmovementoftherearaxle.
Note:Ensurethattheaxlepivotsfreelyafteryoutightenthelocknut.
11.Positionthedrivebelttothecrankshaft,waterpump,andalternatorpulleys.
12.Tensionthebeltandtightenthealternatormountingscrews;refertoInstalling
theAlternator(page3–25).
13.OntheGroundsmaster5910machine,installandadjusttheairconditioning
compressordrivebelt.
14.Checktheengineoillevelandadjustifnecessary.
15.Starttheengineandcheckforanyoilleakage.
16.Lowerthehoodandsecureit.
DieselEngine:ServiceandRepairs
Page3–40
Groundsmaster5900TractionUnit
08159SLRevC