
Service Manual


RemovingtheWingDeckLiftArms(continued)
g032059
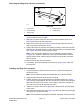
Figure322
1.Liftarm(left)4.Straightbushing
2.Flangebushing
5.Greasetting
3.Greasetting
6.Removethebolt(item23inFigure320)andthrustwasher(item24inFigure
320)fromtheliftarmpivotshaft.
7.Slidethewingdeckimpactarmpivothubandthrustwasher(item29in
Figure320)fromtheliftarmpivotshaft.
8.Removetherollpin(item22inFigure320)thatretainstheliftarmpivot
shafttotheframe.Discardtherollpin.
9.Supporttheliftarmtopreventitfromshiftingorfalling.Pulltheliftarmpivot
shaftfromtheliftarmandframe.Locateandremovethethrustwasher(item
29inFigure320)whileremovingthepivotshaft.
Note:Ifthepivotshaftisdifculttoremove,fabricateapullerasshown
inFigure321.Attachthepullertotheendofpivotshaftwiththepictured
boltandaatwasher.Removethepivotshaftfromtheliftarmandframe
withahammer.
10.Removetheliftarmfromthemachine.
11.Ifnecessary,pressthebushingsfromtheliftarm(Figure322).Cleanthe
liftarmbores.
InstallingtheWingDeckLiftArms
1.Ifthebushingswereremovedfromtheliftarm,pressnewbushingsinto
theliftarmbores.
Note:Ensurethatthebushingsarepressedfullytotheliftarmsurface.
2.Applyanti-seizelubricanttotheliftarmpivotshaft.
3.Positiontheliftarmtotheframewiththethrustwasher(item29inFigure
320)correctlyplacedbetweentherearoftheliftarmpivothubandtheframe.
Slidethepivotshaftintotheframe,thrustwasher,andliftarmuntiltheroll
pinholesinthepivotshaftalignwiththeframe.
4.Installanewrollpin(item22inFigure320)toattachtheliftarmpivotshaft
totheframe.
5.Slidethethrustwasher(item29inFigure320)andthenthewingdeckimpact
armpivothubontothepivotshaft.
Note:Ensurethatthethrustwasherisbetweentheframeandthepivothub.
Groundsmaster5900TractionUnit
Page7–17
Chassis:ServiceandRepairs
08159SLRevC